Taking Care of Your New EXO Sonde
(Updated August 2021)
Once you've purchased your brand new YSI EXO Sonde and sensors, there are some recommended practices to keep your system functioning properly for years to come. Below, you will find a few of the most common issues we see in the repair center and some best-known methods on how to prevent them.
Protecting Your Sonde from Wear and Tear
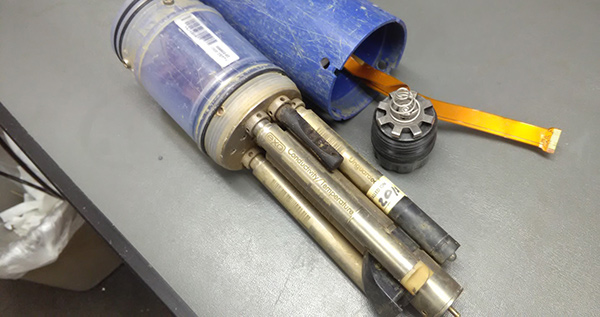
We see sondes that are less than a year old come in with major wear and tear on the body and bulkhead. We know the instruments can be used in some pretty harsh environments to collect their water quality data. However, severe wear on any one part of the sonde’s body can lead to water intrusion which can potentially lead to thousands of dollars in repairs. The sonde below was only a little older than a year when it came into the repair center in pretty rough shape.
Preventing excessive damage to your sonde can be accomplished by using a combination of YSI EXO Probe and Sonde Protective Sleeves and good old Duct tape. The Water Institue of the Gulf recently did a side-by-side study of biological growth with silver, orange and pink duct tape. Even though they didn't find a difference in biological growth, it was easier to locate the brightly colored sondes! However, some swear that aquatic critters don’t like the brightly colored duct tape so it may be worth giving it a try. The protective sleeve covers the sonde’s body and bulkhead and makes the removal of the duct tape a breeze. This solution combined with good mooring practices, to prevent the sonde from getting banged around too much, will keep the body and bulkhead tube in good shape.
>>> Learn more about YSI maintenance/service plans
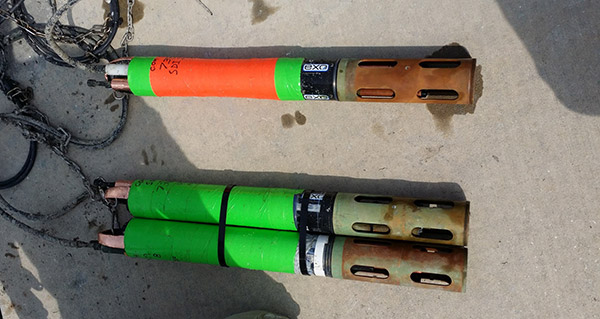
These EXO sondes are in the water 365 days a year

The Water Institute of the Gulf ran a test of different colored duct tape on biological growth. While their test was inconclusive, many swear by the brightly colored tapes!
Taking Care of the Wetmate Connectors
The Wetmate connectors on the top of your battery compartment and in your bulkhead and sensors cannot be ignored! This is frequently the most unnecessary and costly damage to sondes that we see in the repair center. Battery compartments and bulkheads are the most expensive items on the sonde components. Ignoring routine maintenance of these connectors can cost between $800-$1,800+ US dollars in some cases.
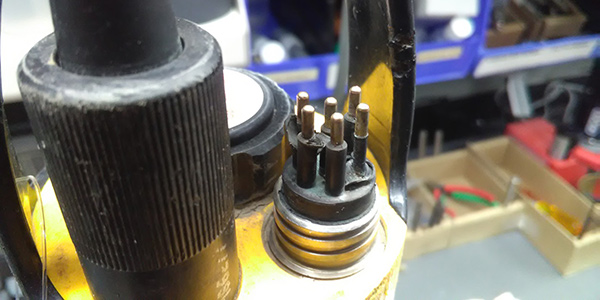
This damage was caused by a lack of Krytox lubrication. This is can be a costly repair but it's easily prevented.
One of the items we see damaged the most is the bulkhead wetmate connectors. These usually are damaged by lack of Krytox® lubricant in the sensor’s wetmate and usually leads to a pin being galvanic oxided off the sensor which adds the cost of the sensor to the repair. As you can see in the picture below the Wetmates are dry of Krytox lubricant.
Pins Oxided Off from Dry Wetmates
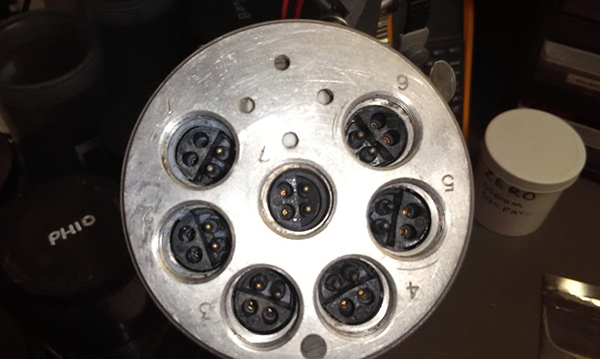
Pin oxided off in bulkhead port from CT Sensor.
As mentioned, EXO sondes utilize wet-mate connectors that greatly reduce problems associated with traditional underwater connectors. However, these connectors must be properly maintained to reap the full benefit of this design. Following these instructions will minimize most potential issues. Never stick any foreign object into a female connector. Use only Krytox grease to lubricate the mating surfaces of the connectors.
Female 6-pin connectors
These connectors are located on field cables, the EXO2 accessory connector, and the EXO Handheld. Periodically inspect the connectors for signs of contamination. If you detect debris, remove it with a gentle blast of compressed air. Prior to initial installation, or when dry, apply a light coat of Krytox grease to the flat rubber mating surface on top of the connector. When not in use, always install the connector’s plug.
Male 6-pin connectors
These connectors are located on field cables and topside sonde connectors. Periodically inspect the connectors for signs of contamination. If you detect debris, carefully remove it. Prior to initial installation, or when dry, apply a light coat of Krytox grease to the rubber mating surfaces of the connector (including the rubber portions of the pins). When not in use, always install the connector’s plug.
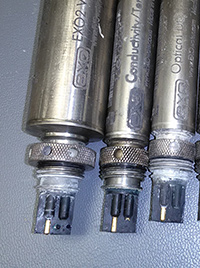
Sensor connectors (4-pin)
These connectors are located on sonde bulkheads (sockets) and sensors. Periodically inspect the female portions of these hermaphroditic connectors and the entire socket for contamination, and remove any debris with a gentle blast of compressed air. Or, alternately, you may flush the port out with soapy water and then flush with DI or tap water to rinse out the soap. Either cleaning method you use, prior to initial installation, or when dry, apply a light coat of Krytox grease to the rubber area of the sensor’s connector.
Replace Locking Nut
If the locking nut near the sensor connector wears out, users can replace it with 599668 (sensor) or 599669 (EXO central wiper). First remove the retaining ring by inserting the tip of a small, flat-blade screwdriver under the lip of the ring and pry upward. Pull the ring out of the groove. Slide off locking nut and replace with new locking nut. Install new retaining ring by prying up one edge with a screwdriver and fitting it into the groove. Use the screwdriver to follow the diameter of the ring around the groove to seat it fully.
CAUTION: Wear eye protection when servicing the retaining ring.
Prefer to have us do the work, we offer EXO sonde maintenance plans that may be of interest.
Minding Your Batteries
The image below shows what can happen when a battery leaks into your sonde. This EXO1 battery compartment was eaten in half by battery acid. This can lead to the loss of all the electronics and sensors that could sink to the bottom of your monitoring location. Be sure to check your batteries before each deployment for acid leakage and never store batteries in the sonde for an extended period of time.

EXO1 water quality sondes use two (2) D-cell batteries as a power source. Using alkaline batteries, users can expect approximately 90 days of deployment from a fully loaded sonde that samples once every 15 minutes. However, deployment times may vary greatly depending on water temperature, sampling rate, sensor payload, and brand of battery. See battery life specification, next page. NOTICE: Do not use Ni-Cad or 3.6V Lithium batteries in the EXO1 sonde.
EXO2 sondes use four (4) D-cell batteries as a power source. Using alkaline batteries, users can expect approximately 90 days of deployment from a fully loaded sonde that samples once every 15 minutes. However, deployment times may vary greatly depending on water temperature, sampling rate, sensor payload, wiper frequency, and brand of battery.
EXO3 sondes use two (2) D-cell batteries as a power source and can expect 60 days of deployment with an average sensor payload while sampling once every 15 minutes. NOTICE: Do not use Ni-Cad or 3.6V Lithium batteries in the EXO sondes.
Battery Life Specification (Example) when using alkaline batteries: Estimated battery life is approximately 90 days for EXO2, and 60 days for EXO3, at 20˚C with a 15-minute logging interval, with temperature/conductivity, pH/ORP, Optical DO, turbidity, and Total Algae-PC sensors installed along with a central wiper which rotates once every logging interval. Battery life is heavily dependent on sensor configuration and is given for a typical sensor ensemble. Battery life is reduced in cold-water applications. When using rechargeable nickel-metal hydride (NiMH) batteries: Estimated battery life is not available because NiMH batteries vary greatly in manufacturer capacity and discharge curves. We recommend a NiMH D-cell battery with a minimum rating of 10,000 milliamp hours that is fully charged each time it is used.

Addition Blog Posts of Interest
Get Your Water Quality Sonde Ready for the Season
7 Tips to Fight Fouling and Extend Water Quality Sonde Deployments | Recorded Webinar
How Do You Connect the EXO2 Sonde and Storm 3 Data Logger?
Extend Your Water Quality Sonde Deployment Times with Wiped Sensors [Case Studies]