Ammonia ISE Calibration and Measurement | YSI TruLine
(Updated August 2021)
The measurement of ammonia is critically important in applications such as wastewater, where treatment plants are required to provide a laboratory measurement of ammonia concentration. The ammonia gas-sensing ion selective electrode (ISE) is an EPA approved method of determining ammonia concentration for compliance reporting.
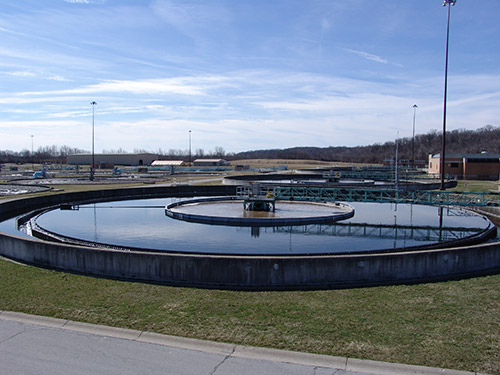
Ammonia is commonly measured in wastewater applications.
Ammonia ISE Measurement Principle
An ammonia gas-sensing ISE (e.g. YSI TruLine Ammonia ISE) has two main structures - a pH electrode and a gas permeable membrane module. A unique ionic strength adjustor (ISA) is used with the ammonia ISE that buffers the sample to a pH greater than 11, ultimately causing ammonia in the sample to become gaseous.
The pH electrode fits inside the membrane module and the sensing end of the electrode is immersed in an internal fill solution. Ammonia gas in the sample will pass through the permeable membrane, resulting in a pH shift within the internal fill solution. This pH shift is detected by the pH electrode and can be correlated to the concentration of ammonia in the sample based on the result of calibration.
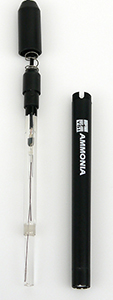
The YSI TruLine Ammonia ISE. A pH electrode is placed inside an outer membrane module that is only permeable to ammonia gas.
Setting Up the Ammonia ISE
To set up the ammonia ISE, first, remove the soaking cap from the pH electrode and set it aside for use when storing the electrode long-term. This soaking cap contains pH 4 buffer and some potassium chloride (KCl).
Carefully fill the membrane module with 15 to 20 drops of fill solution, then tap the membrane module to ensure no bubbles are present behind the membrane.
Slide the membrane module over the pH electrode until the top of the module and the top of the electrode body line up.
Fit the cap over the top of the module and carefully screw tight. Be careful to not rupture the membrane.
Condition the assembled ammonia ISE by soaking in a standard solution for at least 15 minutes prior to use. If completing a two-point calibration (e.g. 1 and 10 mg/L) use the low standard (e.g. 1 mg/L) solution for soaking.
Note: Although not required, it is best to allow the inner pH electrode to condition within the filled membrane module for at least 2 hours prior to use. The assembled electrode can be placed in a low to mid-range standard during this time.
Calibrating the Ammonia ISE
Determination of effective ion concentration with ion selective electrodes is very technique sensitive. Although the ammonia ISE is prone to fewer interferences than other ISEs, a great deal of care must be taken when calibrating in order to obtain accurate and repeatable results. (Learn more, Calibration and Measurement for Nitrate ISEs in the Lab).
Step #1: Connect the ammonia ISE
Connect the ammonia electrode to a meter that has a BNC input and can directly display ion concentration (e.g. display in mg/L). Ensure the instrument has been set up to measure ammonia.

The MultiLab 4010-3 can be used to measure dissolved oxygen, pH, and ammonia.
Step #2: Connect a temperature sensor
Connect a temperature sensor to the instrument, as measuring effective ion concentration is dependent upon temperature. The standard solutions should have a temperature as close as possible to the expected sample.
The YSI ammonia ISE does not have an integrated temperature sensor, but external temperature sensors are available.
Alternatively, the “Alternative Temperature” function of the TruLab and MultiLab can be used to apply a temperature reading from another sensor that is connected to the instrument (e.g. use the temperature reading from a MultiLab IDS pH sensor).

YSI ScienceLine Temperature Sensors
Step #3: Prepare standards
Standards should bracket the expected sample range. For example, if your expected sample range is 5 mg/L, at least one standard must have a lower concentration and one must have a higher concentration.
There should at least be a tenfold (i.e. decade) difference in concentration between the high and low standards (e.g. 10 mg/L and 100 mg/L, not 10 mg/L and 50 mg/L).
At least 2 standards must be used, but the YSI TruLab 1320 and MultiLab 4010-2/3 can accept up to 7 calibration points.
If your standards span more than one decade (e.g. 1 mg/L and 100 mg/L), it is best to prepare at least one mid-range standard (e.g. 10 mg/L).
Each standard should have a volume of 100 mL and should be placed in a 150 mL glass beaker.
Standards should be fresh and prepared very carefully. It is best to use a pipette when measuring small volumes of stock when preparing diluted standards.
Step #4: Place electrode in solution and stir
Place the electrode in the lowest concentration standard and stir at a constant rate using a stir bar and stir plate. The stirring speed should be limited to minimize loss of ammonia gas. Use the same stirring rate when calibrating and measuring samples.
If you do not have a stir plate, it is best to swirl the solution or use a stir rod once ISA is added.
Step #5: Add ISA and begin calibration
Add 2 mL of ammonia ISA to the standard. After adding ISA, the solution should have a pale blue color, indicating the pH is > 11.
Allow the solution to stir for 1 minute and begin calibration. Calibration is time sensitive, as ammonia in the sample is no longer sufficient ~4 minutes after ISA is added. Therefore, ensure calibration with the standard is complete 1 to 4 minutes after ISA is added. This timing is critical! If calibration using the standard is unsuccessful within this time limit, a fresh standard will need to be prepared.
Note: The MultiLab and TruLab have an Auto-Read feature that is used during calibration. If the instrument has not determined the reading is stable, but you are confident the reading is stable, the key can be pressed to accept the point and move on to the next.
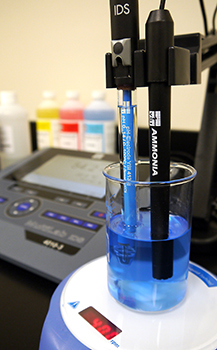
Ideal set-up for calibration. A stir plate, 150 mL glass beaker, temperature sensor (e.g. from pH electrode), ISE instrument, and ISA are all used.
Step #6: Calibrate with additional standards
Once the instrument has accepted the first calibration point, finish calibrating using steps #4 and #5 for the remaining calibration points. Make sure to calibrate in order of increasing concentration.
If calibrating with less than 7 standards, you can finish calibration by pressing the key after calibrating with your highest concentration standard. A complete calibration record will be displayed.
If calibrating with 7 standards, the TruLab and MultiLab will display a complete calibration record after calibrating with the last standard.
Step #7: Evaluate electrode slope
After calibrating, evaluate the electrode slope on the calibration record. For highest accuracy, the ammonia electrode slope should be between -53 mV/decade and -65 mV/decade.
If the electrode slope is out of this range, attempt to recalibrate. Ensure your standards have carefully been prepared, ISA was used, and calibration to each point was completed 1 to 4 minutes after ISA was added.
If the electrode will not calibrate, you have ensured the electrode is correctly assembled, and you are confident your procedure is correct, attempt to clean the pH electrode and/or change the membrane module (see Maintenance section).
Step #8: Recalibrate often
The ammonia electrode should be calibrated at the beginning of each day.
Verify your calibration result every 2 hours by preparing a fresh low to mid-range standard, adding ISA, and verifying the reading. If the mV reading has changed ~3 mV compared to the reading in that standard during calibration, you will need to recalibrate the electrode.
Taking a Measurement
It is critically important that samples be prepared using the same procedure used for standards. Therefore, follow steps #3-5 of the calibration procedure when preparing samples and taking a measurement.
In summary, 100 mL of each sample should be collected and 2 mL of ISA should be added. The sample should be fresh and the same stirring rate used during calibration should be utilized. A measurement can be determined 1 to 4 minutes after ISA is added. The Auto-Read function of the TruLab and MultiLab can be used to ensure the measurement is stable.
Troubleshooting
The following tips may prove useful if you are experiencing issues with the ammonia ISE such as unacceptable calibration results or poor electrode response.
Refresh the internal fill solution
If the internal fill solution does not shift back to its original pH before another sample is taken, the next pH shift is not completely attributed to the new sample or standard. Therefore, if you are having issues with poor slope or drifting readings, the electrode fill solution may need to be refreshed.
To ensure the internal fill solution pH shifts back to its original pH, you may need to:
- Manually refresh the fill solution that is between the tip of the pH electrode and the membrane. This can be done by holding the electrode body sensor side down, pulling the cable back and away from the body/membrane slightly (it is spring loaded to cause the glass to seat up to the inside of the membrane) and then slowly releasing the cable. This pulls the glass away from the membrane, causing the internal fill solution to refresh quickly in the interface area.
- Allow more time between measurements for the pH of the internal fill solution to return to normal.
- Shaking out the old, and refilling the membrane with new internal fill solution every few days might also be useful.

The internal fill solution between the membrane and the tip of the pH sensor can be refreshed by slightly pulling the cable away from the assembled electrode. A spring in the electrode cap allows for this.
Check for a tear in the membrane
To check for a tear in the membrane, place the fully assembled electrode in pH 4 buffer. Since the membrane is only gas permeable, there should be no aqueous ion transfer between the inside and outside of the membrane. Therefore, if the mV reading on the instrument display changes drastically once the electrode is placed in pH 4 buffer, there is a potential leak or tear in the membrane module.
Maintenance
If the electrode has a poor response, you may attempt to clean the pH sensor much like other pH electrodes. Avoid rubbing or scratching the glass sensor.
It may also prove useful to condition the pH electrode by placing it in pH 4 buffer with some KCl added. Ensure the reference (i.e. the white layer where the glass changes in dimension) is completely immersed.
The membrane module will also need to be changed if it is excessively dirty or stretched. These modules can last a long time in clean samples. However, in dirty samples like wastewater where NH3 measurements are common, they may have a much shorter life.
Membrane modules need to be replaced when the electrode no longer calibrates or responds. The module will eventually develop pinholes or tears (likely from mashing the membrane into solids at the bottom of the beaker!), get stretched, or the membrane will become fouled (surface coating).
You may attempt to clean a membrane module that has surface contamination by soaking it in DI water for 1 hour or more, then soak in a low or mid-range standard for at least 15 minutes prior to use.
Electrode Storage
Properly storing the ammonia ISE will help ensure good electrode response and repeatable results.
Short-term storage
Between measurements, the ammonia ISE should be stored in a low concentration standard, such as 1 or 10 mg/L, with ISA added.
For overnight or weekend storage, place the assembled electrode in 1000 mg/L standard and do not add any ISA.
These short-term storage conditions will keep the assembled electrode stable for a comparably long period of time. Do not remove the membrane module for short term storage, as this can stretch the membrane, ultimately causing the electrode to be less responsive.
Long-term storage
For long-term storage, disassemble the electrode and rinse the module and pH electrode with DI water. Carefully dry all parts of the electrode. Place the pH electrode inside the included soaker bottle with pH 4 buffer and KCl added as a storage solution. The membrane module can be stored dry.
Common Questions - FAQs
Question: My electrode from another manufacturer was shipped dry. Is this OK?
Answer: YSI never recommends storing the electrode dry. In fact, no pH electrode should ever be stored dry!
The storage solution the TruLine Ammonia ISE is shipped in contains the proper balance of moisture and salts in order to prevent leaching of reference electrolyte and the active ingredients of the glass membrane. If you are storing the electrode long-term, be sure to place the pH electrode inside the included soaker bottle with pH 4 buffer and KCl added as a storage solution. If you do not have KCl, pH 4 buffer will suffice.
Question: Do I need to recalibrate after using the spring-loaded cable to refresh the fill solution?
Answer: The internal fill solution (IFS) is homogenous, but an air bubble or other issues may change the tiny volume between the membrane and the tip of the pH electrode (i.e. the interface where the pH shift occurs). If the user is very consistent in their preparation (e.g. consistent amount of IFS in the interface) and use of the electrode, recalibration is not needed. However, we recommend recalibration if the user is relatively new to the ammonia ISE.
Question: If measuring at low concentrations, is it OK to wait longer than 4 minutes after adding ISA to calibrate or measure?
Answer: It is not possible to generate more ammonia gas than what is in solution, so there is no reason to wait longer. Ammonia will still become gaseous at the same rate regardless of concentration.
If the user waits longer than 4 minutes, ammonia will start to be depleted and the calibration/measurement result will be negatively impacted.
If you are measuring in low level samples and having difficulty, consider using multiple samples in low level measurement applications for highest accuracy. In addition, some customers have had success using Standard Method 4500-NH3 E (i.e. the known addition method) rather than Standard Method 4500-NH3 D (i.e. the direct calibration method) when calibrating.
They key to success with any gas-sensing ammonia electrode is to have a good, consistent technique!
Question: Is it best to insert the ammonia ISE at an angle so air bubbles don’t get trapped on the membrane?
Answer: The consistent presence of a bubble on the surface of the membrane is not a concern, as ammonia gas can easily permeate the bubble and then the membrane. In addition, inserting the ammonia ISE into the solution at an angle is not feasible on many electrode holders.
Although the consistent presence of a bubble is not a concern, bubbles sporadically moving across the membrane should be prevented. This sporadic movement of bubbles across the surface of the membrane should not occur as long as the membrane is all the way in solution and the stir plate speed is not turned up too high.
Question: How often should I replace the membrane and/or the internal fill solution (IFS)?
Answer: There is no general guideline for this, as the replacement interval simply depends on how often the ammonia ISE is used, the samples measured (are they dirty?!), and the storage practices used. Some customers that use the ammonia ISE every day choose to replace the IFS once a week and the membrane once a month, while other customers only change the membrane and IFS when needed.
If experiencing issues, YSI recommends recalibrating first. If that does not resolve the issue, change the IFS. If issues persist, change the membrane. The internal pH electrode should be the last component replaced.
Indications that a membrane or IFS change is needed include a slow electrode response, the calibration slope is outside the recommended range, and/or the cable pull technique no longer helps.
Question: How often should I replace the internal electrode?
Answer: The internal pH electrode is just like any other pH electrode, so you should expect a similar usable life. Also like other pH electrodes, proper storage of the pH electrode is critical! A pH electrode should never be stored dry or in deionized (DI) water.
Customers that use the electrode extensively should not have to replace their electrode any more than once a year. Some customers report getting at least two years of life out of their electrode. In order to maintain consistency, some customers choose to replace their electrodes once a year.
For continuous monitoring and control instrumentation ISE information you may be interested in the YSI White Paper: Best Practices for Wastewater Process Monitoring of Ammonium and Nitrate with Ion Selective Electrodes (ISE) Sensors.
Additional Blog Posts of Interest
Reliable Ammonium and Nitrate Measurements from Online ISE Sensors
Myths and Realities: Ammonium Based Aeration Control in Wastewater
Tips for Accurate and Repeatable ISE Lab Measurements