Tips for Accurate and Repeatable ISE Lab Measurements
Are you having issues with your lab ISE? Ion selective electrodes (ISEs) can provide very accurate results, but care must be taken when using an ISE, as accurate results are dependent on proper calibration and use.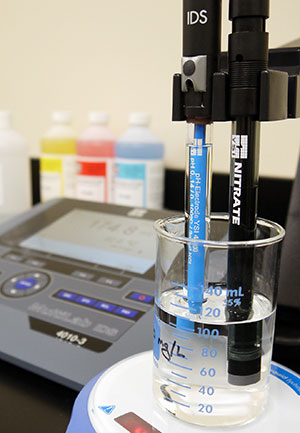
If you are having problems with your lab ISE, or if you just want to learn more about using one, check out these 16 tips for preparing and calibrating a lab ISE.
Note: The gas-sensing ammonia ISE is quite different than other lab ISEs, so please check out YSI’s Ammonia ISE Introduction and Calibration videos if using an ammonia ISE.
1. Use a Meter with an ISE Mode
Connect the ISE to a meter that can directly display ion concentration (e.g. display in mg/L), such as the YSI TruLab 1320, MultiLab 4010-2, or the MultiLab 4010-3.
On the meter, select the ion being measured. The meter will measure and display ion concentration and will consider the valency of the selected ion when evaluating the calibration result.
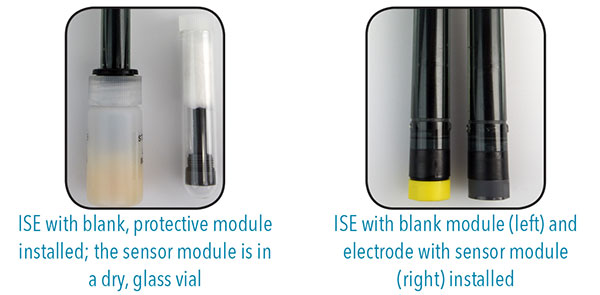
2. Install a Sensor Module (if applicable)
Some electrodes feature replaceable sensor modules (e.g. NH4+ and NO3-). A blank, protective module is typically installed on these electrodes for shipping, while the sensor module is placed in another container.
Ensure the sensor module (not the ‘blank’ module) is installed before using the electrode. Check the sensor module to ensure it is not dirty or damaged.
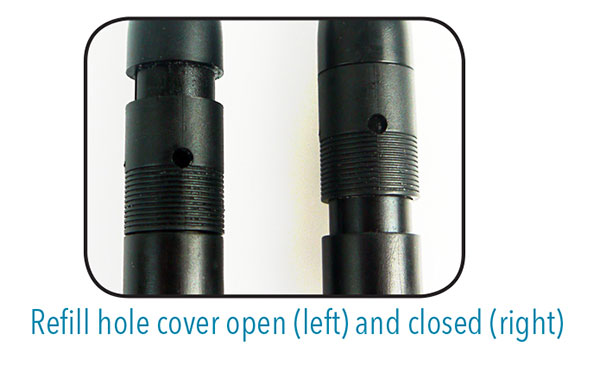
3. Open the Refill Hole
The refill hole must be open when calibrating and measuring!
4. Fill with Clean Reference Fill Solution
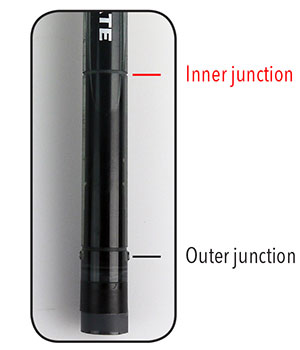
Fill the reference chamber with enough reference fill solution (i.e. electrolyte) to cover the inner junction (for YSI ISEs, it’s the light gray line in the middle of the electrode body; see #9). The level of fill solution must also be above the level of your measurement solution.
Periodically check the level of fill solution and refill as needed.
5. Condition the ISE Before Use
Condition the electrode by soaking it in a mid-range standard (e.g. 10 mg/L if calibrating with 1, 10, and 100 mg/L standards) for ~2 hours before use.
6. Carefully Prepare Standards
At least 2 but up to 7 standards should be used.
Standards should bracket the expected concentration of the samples. For example, if your expected sample is 50 mg/L, at least one standard must have a lower concentration and one must have a higher concentration.
There should be at least one order of magnitude (i.e. decade) difference in concentration between the high and low standards (e.g. 10 mg/L and 100 mg/L).
If your standards span more than one order of magnitude (e.g. 1 mg/L and 100 mg/L), it is best to prepare at least one mid-range standard (e.g. 10 mg/L).
Each standard (and sample) should have a volume of 100 mL and should be placed in a 150 mL glass beaker.
Standards should be fresh and carefully prepared. Serial dilution is the most accurate method for the preparation of standards. It is best to use a pipette when measuring small volumes of stock solution. Alternatively, prepared standards can be purchased.
7. Measure and Calibrate at the Same Temperature (25oC)
For the highest accuracy, all measurement and calibration solutions should be at the same temperature (e.g. temperature-controlled bath is used). Calibrating as close as possible to 25oC is best. If this is not possible, use a temp sensor to compensate for temperature.
8. Stir the Solution
Use a stir bar and stir plate to ensure the solution is well-mixed. Stirring can also increase response time. Use a slow to moderate stirring speed and use the same stirring rate throughout calibration and measurement.
9. Outer Junction Must Be in Solution
The outer reference junction should be completely immersed in the standard or sample. Ensure the level of reference fill solution is above the sample and the inner junction (see #4).
10. Use Ionic Strength Adjustor (ISA)
Add 2 mL of ISA per 100 mL of solution immediately before calibration and measurement. If used, add to all standards and samples.
Although it is not required that ISA be used (it is for ammonia!), the use of ISA will ensure samples and standards have the same ionic strength. This acts to “mask” the influence of interfering ions, allowing the ion of interest to be more accurately measured. Therefore, we strongly recommend using ISA.
11. Calibrate in Order of Increasing Concentration
Begin calibrating with the lowest concentration standard and progress in order of increasing concentration. Rinse with DI water between solutions and blot dry with a lint-free cloth.
12. Evaluate the Electrode Slope
For monovalent ions (e.g. NO3-), the slope should be between 52-62 mV per decade (e.g. the mV difference between 1 mg/L and 10 mg/L standards). For divalent ions (e.g. Pb2+), the slope should be 26-31 mV per decade.
13. Recalibrate Often
In general, calibrate the ISE at the beginning of each day.
For the highest accuracy, verify your calibration result every 2 hours by preparing a fresh low standard, adding ISA (if used), and observing the mV value. If the reading has changed more than +/-2% compared to the reading in that standard during calibration, you will need to recalibrate.
14. Use Same Procedure for Measurements
Standards and samples should be prepared using the same procedures (e.g. same stirring rate, volume of solution, use of ISA).
15. Properly Store the ISE
Electrode life depends greatly on proper storage. Please consult the electrode user manual for more specific information.
Short Term Storage
Between measurements and when storing overnight or the weekend, rinse the electrode with DI water and place it in a mid-range standard. Close the refilling opening.
Long Term Storage
For long term storage, refill the electrode with fill solution and close the refill hole. If applicable, remove the sensor module and place it in a dry, glass vial. Reinstall the blank sensor module. Wet the sponge included in the soaker bottle with mid-range standard and reinstall it on the electrode.
16. Perform Maintenance as Needed
Check the electrode instruction manual before any cleaning procedure. Ensure the reference electrolyte is clean and replace if needed.
The replacement frequency of the ISE and/or replaceable sensor module will vary based on the type of sensor, samples being measured, frequency of use, and proper storage.
YSI offers ISEs for the measurement of Ammonia, Ammonium, Bromide, Cadmium, Calcium, Chloride, Copper, Cyanide, Fluoride, Iodide, Lead, Nitrate, Potassium, Silver/Sulfide, and Sodium.
Some ISEs are EPA approved for wastewater and/or drinking water compliance reporting.
Additional Blog Posts of Interest
A Practical Guide to pH Measurement - The YSI pH Handbook
Laboratory Instruments and Electrodes for pH, ORP and ISEs
YSI Calibration Solutions and Buffers Expiration Times
4 Steps to GLP Compliant pH Measurement and Performance