Nitrate ISE Calibration and Measurement | YSI TruLine
(Updated August 2021)
The measurement of nitrate is important in applications such as wastewater, drinking water, agriculture, and food/ beverage. One EPA approved method of determining nitrate concentration for compliance reporting is the nitrate ion selective electrode (ISE).

Drinking water facilities test the levels of nitrate in lab samples.
Nitrate ISE Design and Measurement Principle
The nitrate ISE is a potentiometric method of determining nitrate in water. This method requires a sensing half-cell that is sensitive to the nitrate ion (i.e. the ISE) and a reference half-cell with an electrochemical potential that is independent of the sample composition.
Some electrodes, such as the YSI TruLine ISEs, feature a combination design for convenience, meaning the reference and the sensing half-cells are in one body housing.
The double-junction YSI TruLine nitrate ISE utilizes a polymer/PVC membrane. Since the lifetime of this membrane is exhausted quicker than other ISE types (e.g. solid state electrodes), the membrane (i.e. sensor module) is user-replaceable, so there is no need to purchase a new electrode body once the polymer/PVC membrane is no longer viable.
Polymer membrane ISEs have various ion-exchange materials incorporated into an inert matrix such as PVC, polyethylene, polyurethane, or silicone rubber. After the membrane is formed, it is sealed onto the end of a PVC tube. The potential developed at the membrane surface is related to the concentration of the target ion.
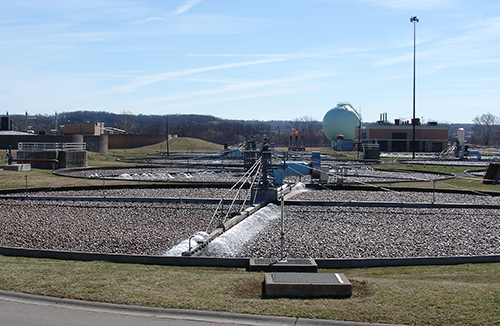
Nitrate is measured in applications such as wastewater.
Setting Up the Nitrate ISE
The YSI TruLine Nitrate ISE performs best when the reference junction is kept wetted during transit and storage. However, the nitrate polymer/PVC membrane is best stored dry. Therefore, the electrode is shipped with a blank sensor module installed.
To keep the ceramic reference from drying out, a soaker bottle with wet sponge is installed over the blank sensor module. The polymer/PVC sensor module is kept in a dry, glass vial.
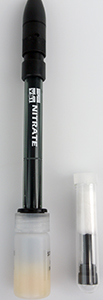
Nitrate electrode with blank module installed and sensor module in dry, glass vial.
Step #1: Install the sensor module
To set up the electrode, remove the soaker bottle and unscrew the module blank (keep for long-term storage). Install the polymer/PVC sensor module, but do not touch the sensor membrane with your fingers!

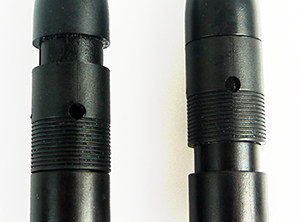
Nitrate electrode with blank module (left) and electrode with sensor module (right) installed.
Step #2: Fill with reference electrolyte
In order to establish an electrical connection between the reference system and the sample, reference electrolyte (i.e. reference fill solution) must leak out of the reference junction. This is very similar to a pH electrode.
To fill the reference chamber with reference fill solution, slide the refill hole cover to the OPEN position (i.e. slide the cover down). Carefully shake the electrode downward to remove any air bubbles trapped inside the chamber.
Refill hole cover open (left) and closed (right).
Refill the reference chamber with enough reference fill solution to cover the inner junction (light gray line in the middle of the electrode body). The level of fill solution must also be above the level of your measurement solution, as this ensures electrolyte flows out of the outer reference junction. There is no harm in completely filling the reference chamber with reference fill solution.
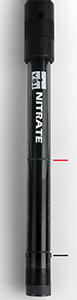
Location of inner junction (red line) and outer (black line) reference junctions.
Step #3: Condition the nitrate ISE
Once the electrode is assembled and the reference chamber is filled with reference fill solution, rinse the electrode with DI water and blot dry (do not rub!).
Condition the electrode before use by soaking in DI water for 10 minutes, then soak in a mid-range standard for 2 hours. For example, if using 1, 10, and 100 mg/L standards when calibrating, condition in the 10 mg/L standard.
Calibrating the Nitrate ISE
Determination of effective ion concentration with ion selective electrodes is very technique sensitive. Most ISEs, including nitrate, can provide inaccurate results due to interfering ions and improper technique. To keep measurement errors at a minimum and to ensure repeatable results, a great deal of care must be taken when calibrating. (Learn more, Calibration and Measurement for Ammonia ISEs in the Lab).
Step #1: Connect the nitrate ISE
Connect the nitrate electrode to a meter that has a BNC input and can directly display ion concentration (e.g. display in mg/L). Ensure the instrument has been set-up to measure nitrate.
Step #2: Connect a temperature sensor
Connect a temperature sensor to the instrument, as electrode response is dependent upon temperature. The standard solutions should have a temperature as close as possible to the expected sample.
The YSI nitrate ISE does not have an integrated temperature sensor, but external temperature sensors are available.
Alternatively, the “Alternative Temperature” function of the TruLab and MultiLab can be used to apply a temperature reading from another sensor that is connected to the instrument (e.g. use the temperature reading from a MultiLab IDS pH sensor).

YSI ScienceLine Temperature Sensors
Step #3: Prepare standards
Standards should be created that bracket the expected sample range. For example, if your expected sample range is 50 mg/L, at least one standard must have a lower concentration and one must have a higher concentration.
There should at least be a tenfold (i.e. decade) difference in concentration between the high and low standards (e.g. 10 mg/L and 100 mg/L, not 10 mg/L and 50 mg/L). At least 2 standards must be used, but the YSI TruLab 1320 and MultiLab 4010-2/3 can accept up to 7 calibration points.
If your standards span more than one decade (e.g. 1 mg/L and 100 mg/L), it is best to prepare at least one mid-range standard (e.g. 10 mg/L).
Each standard should have a volume of 100 mL and should be placed in a 150 mL glass beaker.
Standards should be fresh and prepared very carefully. It is best to use a pipette when measuring small volumes of stock when preparing diluted standards.
Step #4: Open the refill hole and place electrode in solution
Place the electrode in the lowest concentration standard and stir at a constant rate using a stir bar and stir plate.
Ensure the outer reference junction is immersed and the refill hole is open during calibration and measurement!
Use a slow to moderate stirring speed. Use the same stirring rate throughout calibration. If you do not have a stir plate, it is best to swirl the solution or use a stir rod once ISA is added.
Step #5: Add ISA and begin calibration
Although it is not required that ionic strength adjustor (ISA) be used, it will ensure samples and standards have the same ionic strength. This acts to “mask” the influence of interfering ions, allowing the nitrate ion to be more accurately measured by the nitrate ISE. Therefore, we strongly recommend using ISA when doing any laboratory analysis with an ISE.
Add 2 mL of nitrate ISA to the standard. Allow the solution to stir for 1 minute and begin calibration. Calibration with the nitrate ISE is not time sensitive, but you should ensure the standard and ISA are fresh.
Note: The MultiLab and TruLab have an Auto-Read feature that is used during calibration. If the instrument has not determined the reading is stable, but you are confident the reading is stable, the key can be pressed to accept the point and move on to the next.

Ideal set-up for calibration. A stir plate, 150 mL glass beaker, temperature sensor (e.g. from pH electrode), ISE instrument, and ISA are all used.
Step #6: Calibrate with additional standards
Once the instrument has accepted the first calibration point, finish calibrating using steps #4 and #5 for the remaining calibration points. Make sure to calibrate in order of increasing concentration.
It is critically important that all standards and samples be prepared in the same way, so the same amount of ISA (if used) must be added to all solutions!
If calibrating with less than 7 standards, you can finish calibration by pressing the key after calibrating with your highest concentration standard. A complete calibration record will be displayed.
If calibrating with 7 standards, the TruLab and MultiLab will display a complete calibration record after calibrating with the last standard.
Step #7: Evaluate electrode slope
After calibrating, evaluate the electrode slope on the calibration record. For highest accuracy, the nitrate electrode slope should be between -52 mV/decade and -62 mV/decade.
If the electrode slope is out of this range, attempt to recalibrate. Ensure your standards have carefully been prepared and ISA is used.
If the electrode will not calibrate, you have ensured the electrode is correctly assembled, and you are confident your procedure is correct, attempt to clean the electrode (see Maintenance section).
Step #8: Recalibrate often
The nitrate electrode should be calibrated at the beginning of each day.
For highest accuracy, verify your calibration result every 2 hours by preparing a fresh low standard, adding ISA (if used), and observe the mV value. If the reading has changed more than ~3 mV compared to the reading in that standard during calibration, you will need to recalibrate the electrode.
Taking a Measurement
It is critically important that samples be prepared using the same procedure used for standards. Therefore, follow steps #3-5 of the calibration procedure when preparing samples and taking a measurement.
In summary, 100 mL of each sample should be collected and 2 mL of ISA should be added if ISA was added to calibration standards. The sample should be fresh and the same stirring rate used during calibration should be utilized.
The Auto-Read function of the TruLab and MultiLab can be used to ensure the measurement is stable.
Troubleshooting and Maintenance
If you are experiencing issues with the nitrate ISE such as unacceptable calibration results or poor electrode response, you should verify all steps of the calibration procedure are being carefully followed.
If the electrode slope continues to be unacceptable, the following maintenance can be performed on the electrode:
Soak the electrode
Place the electrode in a mid-range standard for 2 hours. This extended conditioning may prove useful.
Change the internal fill solution
Empty the internal fill solution. If there is debris in the solution, you may need to flush it out by refilling and emptying the reference chamber several times.
Clean the membrane
If there is any debris on the polymer/PVC membrane vigorously rinse the membrane under warm water. DO NOT brush or scrub the membrane, as it should not be contacted. Soaking the membrane for 10 to 15 minutes in DI water might also be useful. Recondition by soaking in a low-range standard for 15 minutes after cleaning.
Replace the polymer/PVC membrane
The sensing membrane will age over time and will eventually need to be replaced. The frequency of replacement depends on the samples you are measuring, frequency of electrode use, and the storage practices used.
Electrode Storage
Properly storing the nitrate ISE will help ensure good electrode response and repeatable results.
Short-term storage
Between measurements and when storing overnight or the weekend, rinse the electrode with DI water and place the electrode tip in a mid-range standard. Close the refilling opening when leaving overnight or the weekend to ensure the electrode fill solution does not evaporate.
Long-term storage
For long-term storage, refill the electrode with fill solution and close the refill hole. Remove the polymer/PVC sensor module and place in a dry, glass vial. Reinstall the blank sensor module. Wet the sponge included in the soaker bottle with mid-range standard and reinstall the bottle on the sensing end of the electrode.
For continuous monitoring and control instrumentation ISE information you may be interested in the YSI White Paper: Best Practices for Wastewater Process Monitoring of Ammonium and Nitrate with Ion Selective Electrodes (ISE) Sensors.
Additional Blog Posts of Interest
Calibration and Measurement for Ammonia ISES in the Lab
Online Monitoring of Ammonium and Nitrate Helps Facility Meet Strict Discharge Limits
Nitrate Levels in Aquaculture May Be More Dangerous Than You Think