Prevent Fouling on Your Water Quality Sonde
Fight Biofouling with 7 Expert Tips
(Updated September 2021)
The goal of every monitoring program is to gain a better understanding of an environment. That deeper understanding can lead to better water management tactics or better decision-making. Ultimately, to better understand water – we simply need more data – and the more the better.
To tell the full story of what is happening in a river, lake, stream estuary - high resolution data is critical.
Some organizations only have the resources to monitor on a weekly basis with handheld water quality sampling equipment, and while that is a great first step to collect water quality data, a more robust monitoring schedule of even daily sampling can shed light on events occurring there.
Ultimately, however, we can’t be at the site 24/7, 365 days a year to maintain the high resolution dataset we need via handheld instrumentation. That’s why sondes are critical to building a global water quality data set.
For those of you who are new to water quality monitoring, a sonde (EXO) is a piece of water quality instrumentation that can autonomously record water quality data in-situ for weeks or months at a time. This equipment can be installed throughout a watershed to capture basic parameters on the health of a waterbody. 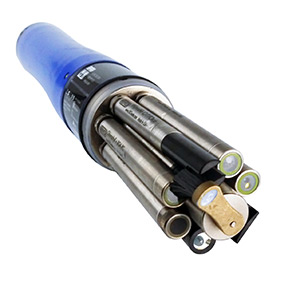
Rain or snow, day or night, sondes continually collect data until they’re pulled from the water or run out of power.
When sondes were initially developed by various manufacturers nearly thirty years ago, the primary limitation on how long they could be deployed into the field was battery life. Sensors were power-hungry and the internal hardware components weren’t nearly as power-efficient as they are today.
It wasn't uncommon for a long deployment period for a sonde to be only a couple of days or even a week if you were lucky.
It wasn’t long before the power limitations of this type of equipment were resolved, and instrumentation could autonomously collect data for months at a time.
The only problem was the quality of the heaps and mounds of data that were being collected. In many environments, within a week (or in some cases even within a day), the deployed sensors were coated in sediment, biofilms, or even barnacles. Data was skewed and near worthless.
Maintaining equipment at that pace made continuous data seem unrealistic from a logistics standpoint. Sending technicians to service instruments every few days was both time-consuming and expensive, especially, if you added in the need for a boat to access the instrument's location.
Everything started to add up financially... The cost of the technicians’ time, the expenses to get out into the field, the supplies used each time to go out to the site, and the opportunity cost of the resources spent... The cost per data point is extreme when your sonde can’t keep its sensors clean of debris.
It was at this point when sensor manufacturers and developers understood the true enemy of high resolution data sets. It wasn’t battery life. It was the barrage of algae, silt, and microorganisms that harsh aquatic environments throw at you and your equipment.
It was sensor fouling. It was biofouling.
The following information highlights 7 tips specific to fight fouling and how to collect the highest quality data over the course of a long-term water quality sonde deployment. Using a combination of our suggestions, you’ll be able to significantly reduce the frequency at which your team must travel to field sites to clean and maintain sondes and water quality sensors.
Tip #1: Copper-Based Anti-Fouling Paint
If you’ve been using sondes for a while you may be familiar with copper-based anti-fouling paint.
This is what was commonly used when we first started thinking about extending deployment times.
The paint was borrowed from the marine industry where it is used to cover hulls of ships and effectively prevented barnacles and other marine organisms from growing and reducing the ship’s performance. Similarly, a sonde can be painted with this anti-fouling paint to achieve the same effect.
Without getting too technical, most anti-fouling paints consist of a copper component like copper oxide and a variety of aromatic hydrocarbons like benzene or toluene for example. For this reason, you would want to be sure to take every necessary safety precaution recommended by the paint manufacturer when applying anti-fouling paint. This would consist of gloves, eye protection, a respirator, etc. and of course making sure you are in a well ventilated area.
A number of manufacturers produce anti-fouling paints that are suitable for YSI sensors. Two products that we have had good success with are Petit Paint’s “Trinidad SR”, and Interlux “ACT BottomKote”. Black paint 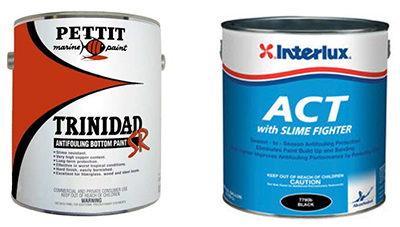 must be used. Both are readily available at marine supply stores or online.
There are no long term effects to using these paints on the instrumentation but be sure to not get any of this paint on the sonde or sensor connectors. Also note this paint will likely flake off over time where the old paint will likely need to be removed and a new coat should be applied.
A sonde painted with copper-based paint will provide quality data for longer periods in the field and require fewer visits for cleaning and maintenance. Organisms have trouble getting a good foothold on the painted surfaces and are more easily cleaned off as well.
Each sensor can be removed and painted separately along with each part of the sonde including the guard. Paint is applied in thin coats and allowed to dry and then reapplied for maximum effect. This process needs to be repeated periodically as the paint flakes off or is removed with cleanings over time. And although an effective way to prevent fouling, the painting process is time consuming and there are increasing concerns over long term toxic effects. So the use of copper based paints may take a little extra time and effort but it will help prevent organisms from growing on your instrumentation and help extend your deployment times.

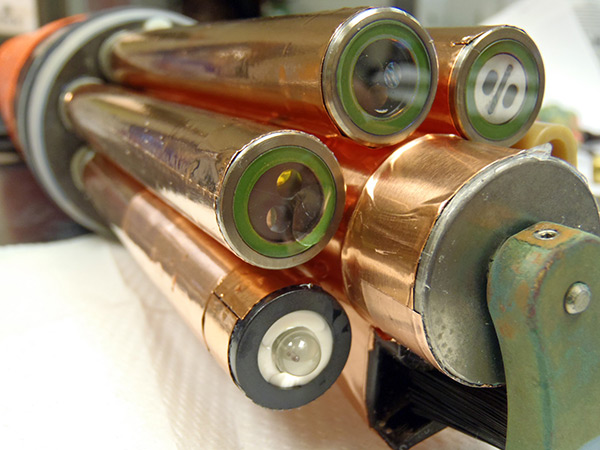
Tip #2: Copper Components
As a more efficient and less time consuming way to prevent fouling, YSI introduced copper components to be used with our sondes around 2006.
Organisms have a hard time getting attached to these copper components much like the copper-based anti-fouling paint. The intention of these components is to obviously extend deployment times but to also provide a faster but just as effective way to prepare the sonde for long term deployments.
Accessories like copper guards, wiper blocks, copper tape, mesh screens, and even copper probes are available and these components all help extend deployment times with very little time investment. The cost of these components varies from less than a hundred dollars for a roll of tape to a few hundred dollars for a copper guard.
Using the copper components, ideally in some combination, increases sonde deployment times. You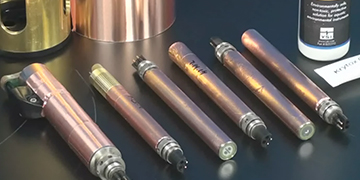 can expect about a month or so of life out of the copper tape before it needs to be reapplied.
Tip: do not let the tape deteriorate too long before you remove and reapply it. The tape is easier to remove if it is still somewhat intact as opposed to waiting when the tape becomes mostly used up.
People with a less steady hand especially appreciate the copper tape which can be easily and quickly applied to all of the probes within just a few minutes. You simply clean your probes and wrap the tape around the probes so they are completely covered as shown in the picture. The tape lasts about a month or so before it needs to be removed and reapplied but the actual copper guards, wipers, and probes can last years.
In addition, there is less of a concern about the toxic effects of using copper materials vs. paints which makes it more environmentally friendly. So remember to consider using copper tape or other copper-based components for an easy way to help prevent fouling and extend your deployment duration.
Several components exist including the copper tape, C-spray, copper guards and port plugs, and copper CT screens.
Read Blog Post: Get Your Water Quality Sonde Ready for the Field Season
Tip #3: Use Mechanical Wipers
We realize everyone’s number one end goal is to collect accurate and complete data sets. The ability to minimize field site visits may be secondary, but still important. Luckily, there are several accessories to assist with deployment longevity.
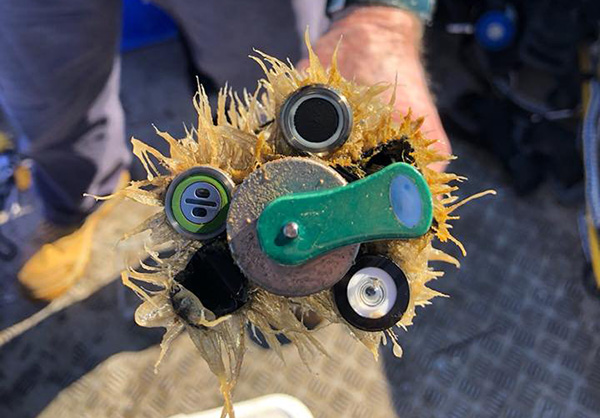
One summer, one of our very own Application Engineers’ deployed a few prototype instruments in the Chesapeake Bay. The Chesapeake Bay is an estuary along the Atlantic that acts as a drainage basin for more than 150 rivers and streams. The deployment was only for a week, so it was decided that no antifouling measures would be taken with the instruments. What did we learn? This was an absolutely terrible mistake!
The only areas that were not covered were the faces of the sensors that were wiped. The biofouling that 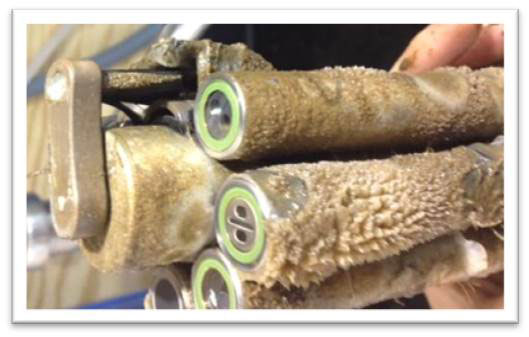 accumulated in that short time was intense. This was the type of biofouling that felt soft to the touch, kind of like wet velvet, but did not want to come off with brushing or soapy water. Our Applications Engineer ended up having to soak them in soapy water for several days to remove the growth, and it still took several hours to clean everything.
So we suggest the number one accessory to mitigate fouling would be a mechanical wiper or wiping system. That’s the first line of defense against bio growth for sensors.
A wiper is a mechanism that sweeps over the sensing surfaces between measurements. In older sonde platforms, each optical sensor had its own wiper that had a soft pad to sweep across this area. However, newer sonde technology uses a centralized wiper with more torque and stronger bristles to clean a whole suite of sensors simultaneously. This wiping design is more robust because it offers more thorough cleaning and there’s only a single brush to maintain.
One of our customers is using the EXO sonde with wiped sensors in some important work in the Great Barrier Reef and is having success acquiring accurate data. Biological growth is kept away with the central wiper system.
Using a mechanical wiper will keep the sensing surfaces clean of debris, but what about the rest of the instrument? There are other accessories to help with fouling and post deployment clean up. Most require basic tools like scissors, an Exacto blade, and a sharpie pen to apply.
Items like shrinkable plastic sleeves can form a protective layer between your instrument and the environment and make cleanup much easier. This works well in soft fouling environments, where things like small aquatic worms, mud, and some algae would otherwise coat your sonde from top to bottom. For hard biofouling, these sleeves need a layer of copper tape or duct tape over them because the barnacles can penetrate the plastic.
Copper alloy screens and guards work well to keep biofouling out of the protected areas. These items may still need some brushing post deployment, but typically will not need a long acid soak.
As we learned in Tips 1 and 2, when items like copper tape, copper alloy guard, and a wiper have been  applied, post deployment cleanup is much faster. Typically, the taped areas can be sliced and peeled away, eliminating an acid soak and several hours of scrubbing and cleaning.
Other areas that were not protected may need a soak, followed by a scrub with a soft plastic bristled brush and clean water rinse. These would include areas like topside connectors, the bail, and securing items.
Having just a few of these accessories will save you hours of cleaning.
Let’s recap - a wiper is your best option for maintaining clean sensor faces, while plastic sleeves and copper tape or duct tape make clean up faster. Also, copper accessories help to deter organisms from settling on your instrument.
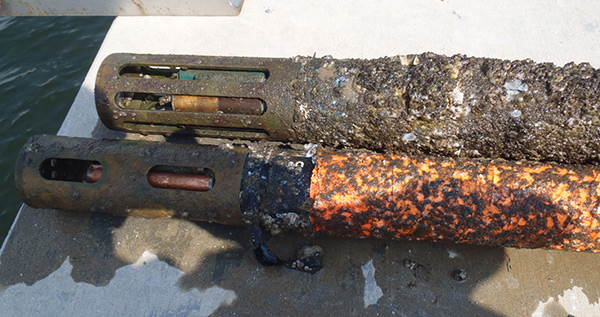
Two sondes side by side. One with no tape (top) and one with tape (bottom). You can see that bio-fouling isn't eliminated but it is lessened and much easier to clean up.
Tip #4: New Sensor Technologies
Even with a lot of the anti-fouling tips we’ve described previously, there is one Achilles heel to most anti-fouling solutions: a sondes’ conductivity sensor.
Most conductivity cells are susceptible to interference from fouling in one way or another. Many of these sensors have their electrodes buried deep within the probe, far out of reach of any kind of anti-fouling wiper or copper accessory. When obstacles like small aquatic life, clumps of sediment, or even algae build up within these closed-off conductivity cells that interfere with the measurement.
Conductivity sensors are designed with “drive” electrodes to send current through the water towards a 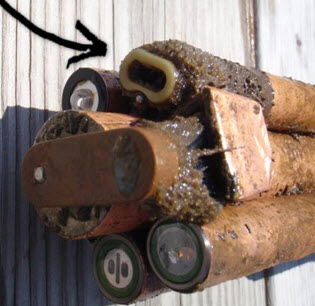 receiving electrode. The amount of signal loss between those two electrodes allows us to calculate the conductance of the water. When this path is obstructed, then there is an artificial drop in conductivity readings, directly impacting the quality of your data over the course of a monitoring period.
Because a sonde’s conductivity sensor is typically the only sensor left unprotected from biofouling, it ends up driving maintenance intervals. Left unchecked, fouling on a conductivity sensor not only impacts the conductivity parameter itself but also dissolved oxygen and depth or level parameters, which use the conductivity reading to compensate for changes in salinity.
Until recently, no conductivity sensor on the market was developed to enable a wiper to clean the electrodes and to maintain a clear path for the measurement. However, YSI released a Wiped Conductivity and Temperature probe (wiped CT) for the EXO sonde platform because we understood the importance of this limiting factor was to long-term deployments.
This sensor is purpose-built for high fouling, long-term monitoring projects and works with any existing EXO2 sonde. The innovation here is that the conductivity electrodes are no longer buried within the sensor and raised to the same plane as the other sensor faces, allowing the EXO Central Wiper to thoroughly clean the measurement surfaces.
As with all our sensor technology, we put our instruments through intense field testing in sites all around the world. In this case study, we tested the Wiped Conductivity probe against a standard probe to get data demonstrating its effectiveness against intense sensor fouling. The new probe is in green and the standard probe is shown here in red in Figure 1.
The standard probe began to exhibit signs of artificial data drift in the first week or two due to fouling accumulating on the sensing surfaces and the Wiped probe continues to collect high quality data over the course of the month-long deployment. A few weeks into deployment, and your conductivity data would be off 10-15% in just a few weeks using an unprotected sensor.
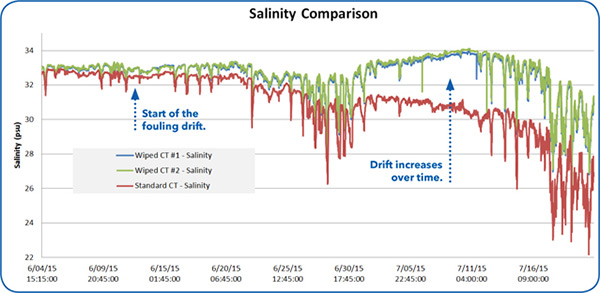
Figure 1: Salinity data from conductivity sensor in long-term case study
As a side note - our Applications Field Specialist, Curtis Butler, says about this: "We say that the Wiped CT is in green which is true, but the amazing thing about this slide is that there are actually two wiped CT sensors running in the test. Green and Blue on the graph. The Wiped CT sensors are running damn close to on top of each other. One of my favorite slides!"
So, to reiterate – Tip #4 is to always keep up with new technology. Manufacturers are always coming up with new technology that can keep sensor fouling at bay. Whether that’s a new Wiped CT Sensor design or other advances.
Tip #5: Instrument Maintenance Pays Off
Accurate and complete data sets are drivers for investing in environmental monitoring platforms.
Let’s use the analogy of maintenance for your car as a comparison for your monitoring platform. There’s regular cleanup and tuning, and then there are things you need a certified expert to perform.
Instrument manufacturers provide guidelines for maintenance because they have an awareness of the items that may need special attention. Think of this like your car’s tune-up. The mechanic will change out belts, lube fittings, and make recommendations based on their diagnostic analysis.
When you send your water quality instruments back for a preventative checkup, an expert technician will inspect items like internal o-rings, internal torque adjustments, perform power consumption tests, pressure tests, and specification testing of the system.
Most people would not buy a car and then never wash it again after they leave the dealership. The same is true for your monitoring platform. For example, after heavy snow or a good 4x4 session in the mud, chances are you will probably wash off your grocery getter before summer or your next off-road experience. This is when you notice scratches, dings, rust, a nail in your tire, or low tires. The same is true for your instruments. Cleaning in between deployments is imperative to minimize fouling and also helps to create a habit of inspecting your investment.
Regular cleaning helps to minimize biofouling by removing biofilms that microorganisms create. When microorganisms adhere to your instrument’s surface they become problematic in a few ways:
- They condition the instrument surface, provide an enzymatic interaction for exchange of nutrients, protection against environmental stress, and increase resistance to biocides
- Once formed, they change the instrument surface chemistry which can lead to macro organism growth, like barnacles
- They also interrupt ion flow, acting like a diffusion barrier, which can lead to localized corrosion
So what are the typical tools needed to clean?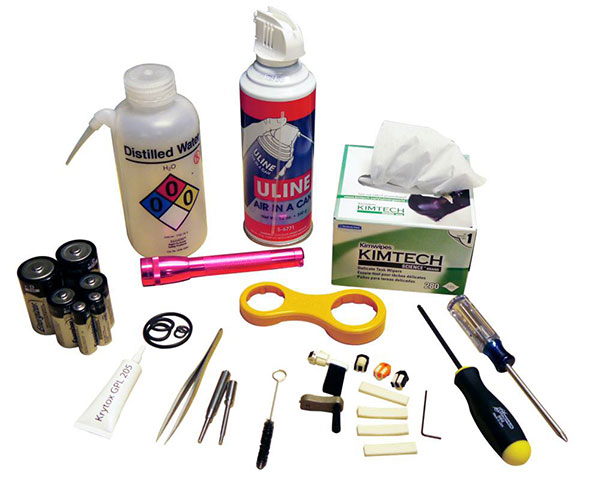
- Mild dish soap
- Dish brush
- Plastic putty knife
- Clean water, tap water is okay
- Non-abrasive scouring pad
- Manufacturer issued CT brush, grease, and syringe
- White Vinegar or 1 molar HCl
For most deployments, soap and elbow grease can typically remove most soft fouling. Soft fouling would include muds, silts, and worms. You can use a brush to get the bulk of the fouling off, then clean each sensor more thoroughly with a scouring pad.
For sites with harder fouling, like barnacles, a short soak in 1 molar hydrochloric acid, typically 10-15 minutes helps to break down the organisms to a point where a brush and scouring pad will work. Be sure to wear cut resistant gloves, these guys can be sharp and you will feel every little razor cut once you make contact with saltwater. If HCl is not available, white vinegar will also break down carbonates, but may take longer, like hours or overnight. Rinse well with clean water after soak.
After all cleaning has been performed; carefully look over your instrumentation. Check the cable’s integrity and connectors. Ensure the connectors are free of debris. You can apply the grease with your bare fingers to areas like o-rings and connectors. This enables you to catch nicks or grit that could compromise seals. Inspect the integrity of the securing items like the bail, carabiners, and chain.
Now, all other water quality sensors plug into a sonde, while your depth or level sensor is built into the sonde body itself. That makes maintaining your depth sensor easy to forget. The depth port is a hole in your sonde where water flows through the instrument and to the internal depth sensor. This port can get fouled just like the rest of your sonde. You may notice from your data, the depth increasing, or you may notice an unexpected measurement when the sonde is on the lab bench. These are both signs of depth port blockage.
Fill the small syringe supplied by the manufacturer with clean water. Force the water into the depth port hole and watch the other hole for water exiting. If it doesn’t, then there may be a blockage. If soft fouling is suspected, then try soaking the area in warm soapy water then repeat the clean water cleanings. If hard fouling is suspected, try soaking the area in some white vinegar. Do not try to clean this area with a brush or pipe cleaner. Follow up the vinegar soak with several clean water flushes.
Lastly, another crucial item to look over is your wiper. This is your first line of defense against fouling. We can’t stress enough how important it is to check your brush for splay, or check your pads for wear and tear. Too much splay or wear can drastically reduce your wiper’s effectiveness. If you have a wiped conductivity sensor, then too much wiper brush splay can also cause ineffective grooming of the conductivity cells. Wiper brush/pad replacement is governed by the site, season, and sensor payload. Low fouling sites may get months of life, while other sites may need changing after only weeks of deployment.
So to recap, this tip covered wipers, maintenance, and brushes. Cleaning instruments well in between deployments and following the manufacturer’s guidelines for maintenance will help to protect your investment and give you confidence in your data.
Tip #6: Consider Your Deployment Location
The way you prepare your sonde before deployment is an important step in ensuring you can prolong the 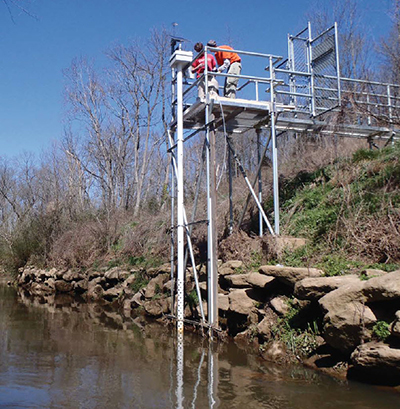 collection of quality data for as long as possible but it is just as important to consider the deployment site. A well-prepared and fouling protected sonde may last a month or more in a harsh environment but if you place it in a deployment location that has not had any protection applied to it you may be wasting your time.
The tube or pipe you place your sonde into should also be protected and maintained in much the same manner your sonde is.
You may need to apply anti-fouling paint to your deployment tube which is used to protect the sonde during deployment.
In addition, you will likely need to clean the inside of the pipe. This is often achieved with a brush with a long handle or by removing the pipe periodically so it can be serviced.
An example of this is a customer call our technical support team took once:
A customer who was having problems with his dissolved oxygen probe contacted a member of our team. The probe calibrated fine and also passed post deployment calibration checks. The problem was when it was deployed and taking measurements and the dissolved oxygen readings would drop near zero. After going through some basic troubleshooting, our technical support representative and the customer talked about the deployment site and we asked about the maintenance on the pipe the sonde was deployed in.
The person informed us they had never serviced the sonde deployment pipe.
We asked him to go to the site and look at the readings while the sonde was still in the pipe. Then take the sonde out and put it back in the water next to the pipe and see if the readings were any different. He called our team back a few days later and sure enough, once he placed the sonde next to the pipe instead of in it the readings went up to the dissolved oxygen levels he was expecting. They removed the pipe and found that all of the holes they had cut into it to allow water to flow through were covered with organisms and when the sonde was inserted it was creating some water exchange causing the dissolved oxygen to go up initially but as the sonde sat there and the water became stagnant, the DO began to drop and he was basically measuring the water quality of the micro environment inside the pipe. Once the pipe was serviced and the sonde was put into place the problems with the DO disappeared. So this is a very good example of what can happen when we only focus on prepping our sonde and forget about the actual deployment site.
A few other things to think about regarding the deployment site to help prolong your deployment:
- If you are using a solar panel to charge a battery that powers your site, make sure the solar panel is pointing in the right direction of course and it’s kept clean of branches and leaves as well as the most common type of fouling which is bird droppings.
- Make sure the site you pick is as easily accessible as possible. If you can choose a site that doesn’t require a boat, a 2-mile hike, or other special accommodations to visit it then choose that route. If it’s easier to access then it automatically makes it easier to service which helps to extend the deployment time.
You can also visit our Systems & Services page for additional information about site deployments or give us a little information about your project and will work with you directly.

Tip #7: Telemetry Helps Keep an Eye on Your Field Site
A lot of monitoring organizations don’t take advantage of using telemetry systems at their field sites. There are a variety of reasons why this is the case, however, the ability to view your sondes’ live data set is a huge advantage when fighting fouling.
For those of you that are unfamiliar with Telemetry, water quality sondes can be connected to data loggers with the ability to wirelessly communicate data to a web portal or online database. This is what we call telemetered data.
With access to your field sites’ data at your fingertips on a smart phone or computer, you can let the instruments’ inform you of when maintenance may be necessary.

If you regularly review your data, you should know historically when certain parameters appear to be impacted by sensor fouling. Generally, you’ll start to notice large, unresolved spikes in optical sensors and conductivity data will start to drift downward.
The idea is to use the live data to drive the frequency of your maintenance visits to a site.
The intensity of sensor fouling is often highly dependent on seasons and weather patterns, so having a strict policy of servicing field sites on a weekly or bi-weekly basis may not make sense year round. In general, the higher the temperature and salinity of the water, the more organic fouling will be an issue for your equipment.
On the other hand, for field sites that have difficulties with sediment fouling sensors, seasons with higher rainfall will be more problematic.
Take advantage of telemetry and turnkey data collection platforms to gvie a live view of your sonde data to help you decide whether or not it’s necessary to spend your time, energy, and resources to head out into the field.
Ultimately, if you’re using sondes to collect water quality data autonomously – it’s almost inevitable that you will run into issues with sensor fouling. That’s a part of the job.
We trust there 7 tips have been useful to you because we truly want to save you a headache and help ensure you get the highest quality data. To summarize the major points:
-
In harsh environments, consider using anti-fouling paints to deter heavy biological growth
-
When available, always use copper components and accessories on your instruments as a passive anti-fouling approach
-
Where possible, use anti-fouling wipers to keep all sensing surfaces clean to ensure you’re collecting the highest quality data
-
Keep an eye out for new technology from sensor manufacturers. New products like EXO’s Wiped Conductivity probe can help protect your data and extend your maintenance intervals.
-
Always take care of your sonde and it will take care of you. Make field visits count by properly cleaning and caring for your instrument.
-
Don’t focus exclusively on your sonde. Maintain the site infrastructure too!
-
Lastly, use telemetry systems to get a live view of your data. This gives you the transparency to know whether or not a field visit is necessary to begin with.
Some of these suggestions require certain accessories or new probes. Don’t be intimidated by the cost of these items. Often times they’ll pay for themselves in no time by saving your team thousands of dollars in wasted field trips. If your field sites are remote, they might even pay for themselves in cost savings from a single prevented visit.
If you can extend maintenance intervals on your equipment from once a week to once a month, imagine the savings. This money could be better spent elsewhere on more productive work.
Additional Blog Posts of Interest
How to Take Care of Your New EXO Sonde
Get Your Water Quality Sonde Ready for the Season
What Does YSI Systems and Services Mean?