Preparing Your Water Quality Sonde for the Season
(Updated August 2021)
Here are 7 tips, straight from the experts to ensure your multiparameter water quality sonde is field ready, which in turn, makes you ready for the sampling season.
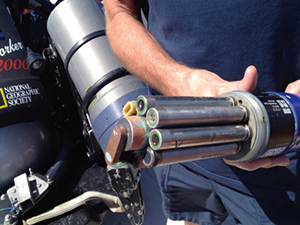
Tip #1: Always Inspect the Condition of Your Sensors
It’s important to inspect the condition of your sensors before you start your maintenance and calibration procedures. There’s no sense in taking the time to calibrate if you have damaged equipment or obviously defective probes. Take note of how your sensors were stored prior to use. Optical probes like turbidity, chlorophyll, or blue-green algae, as well as conductivity probes, can be stored wet or dry and suffer no adverse effects but the performance of your DO and pH probes will be compromised if they dry out. Make sure both of these are stored in moist environments when not in use.
pH probes that have dried out may not look any different than those that were stored properly so that’s why it’s important to take notice of the state of your equipment before you get started. Just looking at the probe doesn’t tell the story, but observing HOW the probe was stored will clue you in that there may be a problem.
If the pH probe is accidentally stored dry, try to rehydrate it by soaking it in a pH 4 buffer for several hours and then attempt calibration. If calibration fails after the rehydration attempt, then your pH probe will need to be replaced. If the bulb is broken, there is no reason to attempt calibration. There is no way to repair or reattach a bulb to a broken pH probe. The probe will need to be replaced. Dirty pH probes can be cleaned by soaking them in a bleach/water solution. Consult the manuals for complete cleaning procedures.
The age of the probe is another visual inspection to make note of. All YSI probes and instrumentation, in general, have lot numbers or serial numbers which tell us the age of the equipment. They begin with two numbers and then a letter. The two numbers indicate the year of manufacture and the letter indicates the month. A is for January, B is February, C is March and so. We do skip the letter “I” however and December is denoted by the letter M.
Example: A pH probe with the lot number 11E was manufactured in May (E) of 2011 (11).
pH probes have a general lifespan of 12 to 18 months and that’s whether you’re actively using it or not. If a pH probe is over a year old, pay closer attention to calibration if the probe appears to be in good condition and is clean but you have a slow response or a questionable slope, then the problem may be the age.
Now, let's talk about the optical dissolved oxygen probe. Check the optical membrane cap for excessive scratches in the painted surface. The paint is designed to help with ambient light rejection. If too much of this paint is missing, it can lead to erratic readings, and also be sure the ODO membrane has not dried out. As a rough estimate, if the ODO cap has lost 1/3 of its paint, you may need to replace it. You’ll likely have difficulty calibrating and experience jumpy readings if too much of the paint is removed. Replacement caps can be purchased and easily installed by our customers. No need to send it in for this service. If the optical DO membrane has dried out, rehydrate it by submerging it in tap water for several hours, 4 to 6 should be sufficient. Then try to calibrate it and note the stability of your probe’s readings. If the results are questionable, replace the ODO membrane.
Tip #2: Properly Maintain Your Instrument Sensor Connections
The connections where your probes/sensors are installed are as important as the sensor itself. Many of our instruments require these connections to be clean and dry in order for the sensor to optimize its performance. Water, dirt, corrosion, or any other foreign material found in these connections will likely cause interrupted signals and the collection of erroneous data. Flush the ports out with deionized or distilled water, if necessary, and then follow up with a rinse of isopropyl alcohol and a blast of compressed air to help aid in the drying process. Make sure you allow ample time for the port to dry once it has been rinsed before reinstalling the probes, 4 to 6 hours is ample. Be careful during this process that you do not bend or break the connection pins or damage the threads where the probe is installed. This may result in costly repairs and unwanted instrument down-time.
In addition, be sure to inspect the o-rings on your probes and replace any that are damaged or missing to help prevent future water or dirt intrusion. Don’t add more o-rings in an attempt to make the seal better. This doesn’t help and will actually promote leakage into the port. Add a little o-ring grease to the o-rings as well. This will keep the o-rings in good shape and help them keep the water out. Only a little grease is necessary here. Just enough so the o-ring looks shiny. Again, more grease is not better! Feel free to use the Krytox grease YSI provides or Silicone grease as a suitable substitute.
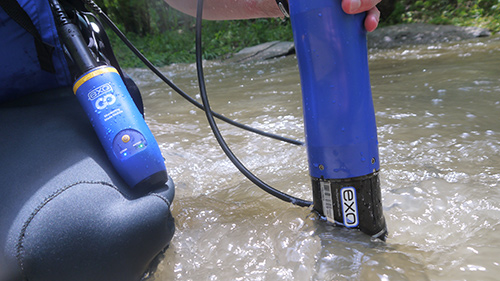
Now, we did mention above that “Some instruments require clean, dry connections.” There is an exception to this rule. The exception is YSI’s EXO instrumentation. These have wet mate connections that will work just fine if water gets into them. The key with these probes and ports is to grease the rubber around the connections so it doesn’t dry out and crack. Feel free to flush out these ports with water if needed but you don’t necessarily need to wait for them to dry before you reinstall your probes.
Tip #3: Always Check Your Batteries and Power Supply
Believe it or not, our YSI Technical Support team gets more calls that relate to batteries than almost anything else. We’ve officially decided the new golden rule of technical support is – always check your batteries. It's akin to your IT department always asking if you've rebooted your PC first before calling them!
There are a variety of potential issues that come from battery-related problems, like leaks for example. You always want to make sure when you’re preparing a sonde for the field that you check the battery compartment. There’s always a chance that someone left some batteries inside – which is a big no-no for long-term storage.
Just like in other electronic devices, alkaline batteries can leak fluid that is harmful to the internal compartments of a sonde.
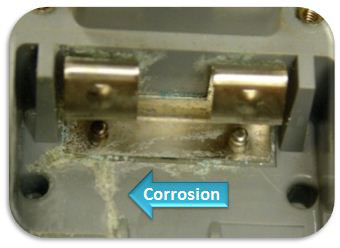 Sondes that have been exposed to these types of fluids for longer periods of time will most likely have corroded battery contacts and need to be sent to a service center for repairs. But, if you catch this problem early enough, you can clean out the compartment using a mixture of DI water and baking soda to neutralize any acid, and so long as the spring is shiny and intact, the sonde should still function. If the spring is a greenish/blackish color, then it will likely fail eventually - if it works at all.
Another battery-related issue that comes up often is the use of lithium or nickel-cadmium (NiCd) batteries in sondes. In concept, sounds great – longer lasting batteries, what could be bad about that? Well, it turns out that the voltage of these batteries is much higher than traditional alkalines and can fry some of the sonde’s electronics. Stick with traditional D-batteries or rechargeable nickel-metal hydrides where the voltage per battery is 1.6 v.

Finally, before you step into the field to do any serious data collection, swap in fresh batteries to your sonde. It’s common to hear about customers who deployed their sonde for long-term monitoring, only to realize once they’ve retrieved it that they only have data for the first few days. If you’re spot sampling, it’s important to have an extra set of batteries with you just in case you run into any issues.
Tip #4: Always Keep Firmware and Software Updated
Your water quality sonde and its data are only as up-to-date as the software. If you remember in tip # 3, our YSI technical support team receives dozens of calls regarding battery-related issues, so their golden rule of thumb is "always check your batteries." A close second to this rule is "always make sure your equipment is up to date with firmware/software upgrades". This is especially the case with newer technology like the YSI EXO, where the instrumentation is continuously improved by the R&D team and based on customer feedback.
Chances are if you are running older versions of software or firmware, any issues you may experience with your equipment have been resolved in a more recent update.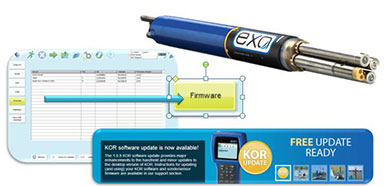
So, before you calibrate your sensors or record data - always make sure you're up to date so that you have the latest features for your sonde. If you're using YSI 6-Series sondes, you can download the YSI Code-Updater from our website and this will update your sonde to the latest version.
If you're using an EXO sonde, you can visit the software support section to download the latest firmware and software packages, or simply attempt an update within the desktop KOR program in the firmware section. You do not need an active internet connection and adminstrative rights on your computer to successfully update equipment.
If you do have an EXO instrument, we frequently release updates, so please check out the software page for more information.
Tip #5: Properly Calibrate All Your Sensors Prior to Collecting Data
We always recommend that the first place you go to when you have questions regarding a calibration procedure for a certain sensor is the manual. The manual covers most of the details but what we want to cover in this post are the details that may not be spelled out in your manual so directly and some precautions to be aware of regarding calibration.
First, take a look at your temperature sensor. Is it giving you accurate readings? All water quality sensors depend on a working temperature sensor to provide reliable data. If your temperature sensor is bad, there’s no reason to proceed with calibrations. You’ll need to replace the temperature sensor before proceeding because there is no way to calibrate the temperature on most devices.
In order to determine if your temperature is reading accurately, obtain a NIST traceable thermometer or other certified temperature sensors to check against your instrument's temperature accuracy. Check your manual for your temperature sensor’s specifications and if it’s outside this range, you’ll need to either send the unit in for service or obtain a replacement. Also, be sure to have your traceable thermometer returned for recertification at a regular interval. This is usually quarterly or yearly depending on the device.
Next, make sure you are always using fresh calibration standards or solutions. Check the manufacturer’s expiration date and note when the bottles were opened. The expiration date on the bottle is generally for an unopened bottle and can differ once the bottle has been opened. People contact the YSI technical support team sometimes and ask if they can use standards that are only expired by a month or two. It’s not recommended to use calibration standards that are expired. Generally the expiration date is there because the calibration standard degrades to a point that it will no longer be able to assist us in accurate calibrations.

Our technical support team also receives questions about using standards more than once for calibration purposes. Most S.O.P.’s recommend not reusing standards for calibration. Calibrations using expired or previously used standards may result in gathering questionable data. In both of these instances you are likely introducing error, and you would need to develop a way to quantify how much error is being introduced so your data can be corrected.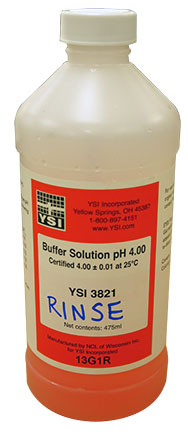
One thing you can definitely do with your standards is reusing them for RINSING. Feel free to collect your calibration standards from today in a bottle labeled as RINSE and use them to rinse between standards during your next calibration.
During calibration, take note of the sensor's response times and make sure you allow the probes enough time to stabilize before proceeding. If the probe is having trouble stabilizing during calibration, you can expect similar issues when you are trying to collect data in the lab or out in the field. You may want to consider whether you need to perform some maintenance or replace a probe if the problem cannot be resolved.
After calibration, make note of indicators like the conductivity cell constant, the pH millivolt slope, the DO gain, or the QC score provided by our EXO sondes. These diagnostic tools will assist you in determining the success of your calibration. On a related note, you don’t want to accept any calibrations that are out-of-range or giving warnings of questionable results. This indicates there is a problem and further investigation is needed to determine the cause of the problem. Forcing a bad calibration is never a good idea and it is likely you will be collecting questionable data if you bypass these warnings.
Finally, dispose of your calibration standards according to the requirements of your region. This varies from region to region so contact your local water authorities like the EPA or the water department to determine disposal requirements for specific calibration standards. (Learn more, YSI EXO University).
Tip #6: Finalize Your Sonde Settings Prior to Leaving for the Field
After completing YSI expert Tip #5, your equipment should now be properly calibrated. Now, you are ready to finalize your settings before heading out into the field. There are quite a few different configuration options to choose from, but these will all relate to how you want your equipment to record data. So, how you plan to use your sonde is relevant here and flexible enough to allow you to determine what you need.
For spot sampling or profiling – it may be important that you have GPS logged alongside your measurements. With newer technology like EXO, GPS is a built-in feature that simply needs to be activated in the handheld’s options menu. Once activated, each recorded data point is tied to the associated GPS coordinates in the exported data files.
We also have the EXO KorLink, bluetooth adapter designed for seamless integration with any EXO sonde with a field cable. The portability of EXO KorLink frees up your hands in the field. On-the-spot GPS coordinates and barometric pressure are viewed through the newest KorEXO Software running on both laptops and tablets. The device is IP-67 rated and highly ruggedized to withstand drops, drips, and dunks!
If you’re interested in recording this data alongside a 6-Series sonde – the process is a bit more complicated, but still possible. However, you will need a third party GPS device
Another relevant option for sampling and profiling applications is site support. EXO includes the ability to tag recorded data files with site names, and this is particularly helpful if your monitoring group manages several different sampling locations. Tagging each data file to a particular area is a great way to make the mountain of data files easier to sort at the end of the day.
Now, for long-term monitoring, setting up your deployment settings is critical, especially if connecting the sonde to a DCP. In your deployment settings, you’ll need to set an appropriate logging interval, as well as make any adjustments to SDI-12 or RS-232 output so that the data you’re collecting aligns with that of the data logger.
One of the most helpful deployment options for sondes is Adaptive Logging. This allows your sonde to increase its sampling rate to capture events as they happen if certain thresholds are met, like if pH were to drop below 5 or depth were to exceed a certain value. If you elect to set up adaptive logging for your sonde, be aware that any battery life estimates do not take this option into account, so you may not get data over the full range you’re expecting.
Finally, one last thing to check before leaving the office is your sonde and handheld’s clock. It’s fairly common for people to forget to check the time on their equipment, later to realize that all their data is tagged with incorrect times. Also, if you set an exact time for your sonde to begin logging data in a deployment, it may not even start when you wanted it to.
Tip #7: When Going Into the Field, Always Bring a Survival Kit
Our technical support group talks to dozens of people every week and thousands of people in the course of a year. During some of these customer calls, our technical support team's ability to help is limited because the person calling does not have any tools or supplies with them to go through some of the basic troubleshooting steps while in the field.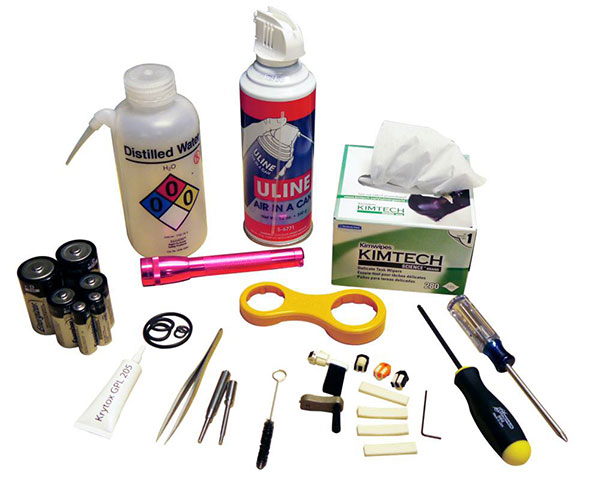
This is why we recommend you put together a survival kit specific to your instrumentation and needs. We will give you some pointers on items to include in your kit but you’ll need to determine what else goes into the kit. Think about where you are going and consider the resources you will have once you get there.
Sometimes we need to drive or ride in a boat for hours or hike in the wilderness for a while before we get to the sampling site and there might not be anywhere to obtain parts for troubleshooting.
First and foremost, make sure you have some tools with you that will allow the removal of a probe or the cover of the battery compartment. Most instruments are provided with a maintenance kit that includes these tools or other specialized components like o-rings and grease so there’s a good place to start when assembling your survival kit. In addition, a Phillips and flat head screwdriver often come in handy as well as a small flashlight, a can of compressed air, extra wiper pads or brushes, paper towels, Kim-Wipes, DI water, and a few calibration standards might be helpful just in case.
Extra cables and probes may be of use if available and we always recommend taking some port plugs which take the place of a probe when it's not installed. Of course, don’t forget spare batteries and make sure the components in your kit that have a limited shelf life are swapped out regularly. If you take a small survival kit with you and a problem arises, you are going to be prepared to do some troubleshooting and hopefully get back on track so you can collect your water quality data.
Additional Blog Posts of Interest
Turbidity Measurements: Tips and Precautions
Measuring ORP: Tip Tips for the Best Data
Extend Your Water Quality Sonde Deployment Times with Wiped Sensors [Case Study]
The Evolution of Water Quality Monitoring eBook