How to Calibrate the pH and ORP Sensor on the Pro Plus
(Updated Feb. 2024)
Looking for tips and troubleshooting suggestions for calibrating the pH, ORP, or pH/ORP sensors on a Professional Plus instrument? Look no further. For more detailed information on calibration and information on how to set up and operate a Pro Plus, please refer to the Pro Plus User Manual.
Please note the ProPlus has been replaced by the ProQuatro. See the Comparison Guide and ProQuatro manual for more information; however, much of the following guidance will apply to both instruments. Learn more: 5 Reasons to Upgrade from ProPlus to ProQuatro
The Calibration Worksheet in the Professional Plus Calibration Tips document is also available for your convenience (see page 2 of the document for the calibration worksheet). Utilizing the Calibration Worksheet can help document your calibration and track the performance of your sensors.
Before calibrating any Pro Plus sensor, it's a good idea to verify that the temperature sensor is reading accurately by comparing it to a traceable thermometer or other known reference in a water bath. Temperature compensation is used in every other sensor measurement, so its accuracy should be verified and recorded each time the Pro Plus is calibrated. When comparing the measurements, consider the specification tolerances of the Pro Plus temperature sensor and the thermometer.
The Pro Plus temperature sensor cannot be calibrated, nor should calibration be required.
pH Calibration Tips
The pH calibration should be verified every day the instrument is used. However, a new pH sensor may be capable of holding its calibration for several days.
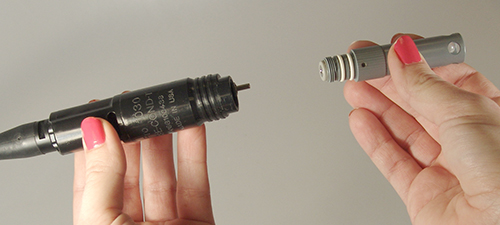
The Pro Series pH sensor being lined up to install on a single-port cable. Notice the double o-ring to create a water-tight seal when installed.
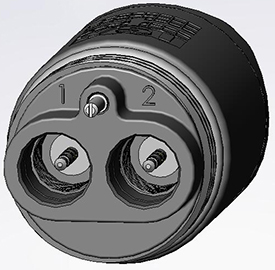
1. If using a pH sensor in a 6051010 or Quatro cable, calibrate the sensor in port 1 prior to calibrating the sensor in port 2. The sensor in port 2 uses the reference of the sensor installed in port 1. Therefore, it is important to verify that the port 1 sensor is working properly before calibrating the port 2 sensor. See pH Troubleshooting Tips below for additional info.
2. The pH sensor can be calibrated with up to six calibration points.
3. Calibration can be accomplished in any buffer order.
4. pH 7 buffer should be used regardless of how many calibration points you use; however, it does not have to be the first point.
5. In most cases, a two-point calibration is all that is required (4 and 7 or 7 and 10). You can bracket the expected in-situ pH values. Use a three-point calibration with 4, 7 and 10 if the in-situ pH values are unknown or if you expect the in-situ values to be on both sides of the pH scale.
6. Rinse the sensors and cal cup with a small amount of pH buffer. Fill the cup so that the pH sensor tip and the temperature sensor are submerged in buffer.
7. If necessary, highlight the Calibration Value and enter the pH value of the buffer solution.
Note: The Pro Plus has auto buffer recognition which can be set to USA (4, 7, 10) or NIST (4.01, 6.86, 9.18) buffer values in the pH Sensor Setup menu.
8. Record the pH millivolts for each calibration point. The acceptable mV outputs for each buffer are shown below.
pH 7 mV value = 0 mV +/- 50 mV
pH 4 mV value = +165 to +180 from 7 buffer mV value
pH 10 mV value = -165 to -180 from 7 buffer mV value
- A value of +50 or -50 mVs in buffer 7 does not indicate a bad sensor.
- The mV span between pH 4 and 7 and 7 and 10 mV values should be ≈ _165 to 180 mV. 177 is the ideal distance. The slope can be 55 to 60 mV per pH unit with an ideal of 59 mV per pH unit.
- If the mV span between pH 4 and 7 or 7 and 10 drops below 160, clean the sensor and try to recalibrate.
9. Wait for the pH to stabilize in each buffer and then press enter to accept each calibration point.
10. Rinse the sensor and cal cup with a small amount of the next buffer between calibration points.
11. After pressing enter to accept your last calibration point, press the cal key to complete the calibration. Otherwise, you will continue calibrating up to 6 calibration points.
12. If you receive a warning message stating that the calibration is questionable, do not continue with the calibration. Instead, select ‘No’ and investigate what is causing the questionable results. If you accept a questionable calibration, your pH readings will be erroneous. Typical causes for this error message include incorrect Sensor/Port setup in the instrument, a dirty sensor, or a bad buffer solution.
13. After accepting a good calibration, navigate to the GLP file and check the pH Slope and Slope % of ideal. A good slope should be between 55 and 60 mVs while the ideal is 59 mV. If the slope drops below 53, the sensor should be reconditioned and recalibrated.
pH Troubleshooting Tips
The typical working life for pH sensors is approximately 12-24 months depending on usage, storage and maintenance. Proper storage and maintenance generally extend the sensor’s working life.
Clean and recondition the sensor if a slow response in the field has been reported or if it takes more than 90 seconds to stabilize in pH buffer.
If you get an error message during a pH calibration, check the following:
1. Ensure the pH buffers are good and not expired
2. Ensure that the pH sensor is installed in the correct port of the cable and the correct ISE is enabled in the Sensor Setup menu.
a. If using a pH or pH/ORP combo sensor in a 6051020 cable, ensure the sensor is installed in port 1.
b. If using a pH or pH/ORP combo sensor in a 60510, 6051020 or 6051030 cable, pH should be enabled in ISE1 of the instrument’s Sensor Setup menu.
c. If using a pH sensor in a 6051010 or Quatro cable, check to see if the pH sensor is installed in port 1 or port 2. If the pH sensor is installed in port 1, enable pH in ISE1 of the Sensor Setup menu. If the pH sensor is installed in port 2, enable pH in ISE2 of the Sensor Setup menu. Note: It is not recommended to use a pH/ORP combo sensor in 6051010 or Quatro cables. If using a pH/ORP combo sensor in a 6051010 or Quatro cable, ORP will not be measured or reported.
3. If using a 6051010 or Quatro cable, you must have a sensor installed in port 1 for port 2 to operate. Additionally, ensure that the sensor installed in port 1 is in good working order. In 6051010 and Quatro cables, the sensors installed in port 1 and port 2 use the reference from the sensor installed in port 1 only. Therefore, if the sensor installed in port 1 is not working properly, the readings from the sensor installed in port 2 will be erroneous. For greatest ease, install a pH sensor in port 1 of both 6051010 and Quatro cables and your other ISE sensor in port 2.
4. If you continue to get error messages during calibration, clean and recondition the sensor.
Cleaning and Reconditioning the pH, ORP or pH/ORP Sensor
If the pH or pH/ORP sensor has been allowed to dry out or has been stored in distilled or deionized water for an extended period of time, soak the sensor in buffer 4 overnight to try and restore functionality.
Cleaning is required whenever deposits or contaminants appear on the glass and/or platinum surfaces or when the sensor’s response slows. The cleaning can be chemical and/or mechanical.
Removing the sensor from the cable may make cleaning easier. Initially, moisten a soft clean cloth, lens cleaning tissue or cotton swab to remove all foreign material from the glass bulb and/or platinum button. Then use a moistened cotton swab to carefully remove any material that may be blocking the reference electrode junction of the sensor.
CAUTION: When using a cotton swab, be careful NOT to wedge the swab between the guard and the glass sensor. If necessary, remove cotton from the swab tip, so that the cotton can reach all parts of the sensor tip without stress. You can also use a pipe cleaner for this cleaning if more convenient.
If good pH and/or ORP response is not restored, perform the following additional procedure:
1. Soak the sensor for 10-15 minutes in clean water containing a few drops of commercial dishwashing liquid.
2. GENTLY clean the glass bulb and platinum button by rubbing with a cotton swab soaked in the cleaning solution.
3. Rinse the sensor in clean water, wipe with a cotton swab moistened with clean water, and then re-rinse with clean water.
If good pH and/or ORP response is still not restored, perform the following additional procedure:
1. Soak the sensor for 30-60 minutes in one molar (1 M) hydrochloric acid (HCl). This reagent can be purchased from most lab supply distributors. Be sure to follow the safety instructions included with the acid.
2. Rinse the sensor in clean water, wipe with a cotton swab moistened with clean water (not DI water), and then re-rinse with clean water. To be certain that all traces of the acid are removed from the sensor crevices, soak the sensor in clean tap water for about an hour with occasional stirring.
If biological contamination of the reference junction is suspected or if good response is not restored by the above procedures, perform the following additional cleaning step:
CAUTION: Do not mix the acid from the previous step with the chlorine bleach in the following step. A toxic gaseous product can form from the reaction between the acid and the chlorine bleach. Be certain to copiously rinse the sink and drain system of acid after its disposal and before the disposal of chlorine bleach.
1. Soak the sensor for approximately 1 hour in a 1:1 dilution of commercially available chlorine bleach.
2. Rinse the sensor with clean water and then soak for at least 1 hour in clean tap water with occasional stirring to remove residual bleach from the junction. (If possible, soak the sensor for a period of time longer than 1 hour in order to be certain that all traces of chlorine bleach are removed.) Then re-rinse the sensor with clean water and retest.
Prior to reinstalling the sensor, dry the port and sensor connector with compressed air.
If your pH sensor is still not calibrating after performing a sensor cleaning, contact your local YSI Representative r a YSI Authorized Service Center.
ORP Calibration Tips
The ORP calibration should be verified every day the instrument is used. However, a new ORP sensor may be capable of holding its calibration for several days.
1. If using a pH/ORP combination sensor, calibrate pH first to ensure it is working.
2. If using an ORP sensor in a 6051010 or Quatro cable, calibrate the sensor in port 1 prior to calibrating the sensor in port 2. The sensor in port 2 uses the reference of the sensor installed in port 1. Therefore, it is important to verify that the port 1 sensor is working properly before calibrating the port 2 sensor. See ORP Troubleshooting Tips for additional info.
3. Rinse the sensors and cal cup with a small amount of ORP calibration solution. Fill the cup so that the ORP sensor tip and the temperature sensor are submerged in solution.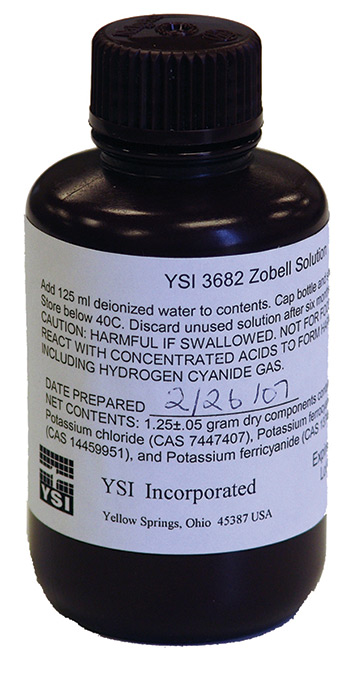
4. Enter the calibration value per the temperature reading. The value of ORP calibration solution is greatly affected by temperature. The ORP solution should include a chart of solution values per temperature. If not, contact the supplier of the ORP solution to obtain this information. The Pro Series ORP sensors use a Ag/AgCl 3.5 M KCl reference. Be sure the value you enter is for this type of reference. If using the YSI Zobell calibration solution, the Pro Plus will automatically determine the calibration value.
5. Wait for the readings to stabilize and then press enter to accept the calibration.
6. If you receive a warning message stating that the calibration is questionable, do not continue with the calibration. Instead, select ‘No’ and investigate what is causing the questionable results. If you accept a questionable calibration, your ORP readings will be erroneous. Typical causes for this error message include: incorrect Sensor/Port setup in the instrument, a dirty sensor or bad calibration solution.
ORP Troubleshooting Tips
The typical working life for ORP sensors is approximately 12-24 months depending on usage, storage and maintenance. Proper storage and maintenance generally extends the sensor’s working life.
Clean and recondition the sensor if the sensor exhibits a slow response in Zobell solution, i.e. it takes more than 90 seconds to stabilize when placed in Zobell.
If you get error messages during an ORP calibration, check the following:
1. Ensure the ORP calibration solution is good and not expired.
2. Ensure that the ORP sensor is installed in the correct port of the cable and the correct ISE is enabled in the Sensor Setup menu.
a. If using an ORP or pH/ORP combo sensor in a 6051020 cable, ensure the sensor is installed in port 1.
b. If using an ORP sensor in a 60510, 6051020 or 6051030 cable, ORP should be enabled in ISE1 of the instrument’s Sensor Setup menu.
c. If using a pH/ORP combo sensor in a 60510, 6051020 or 6051030 cable, ORP should be enabled in ISE2 of the instrument’s Sensor Setup menu.
d. If using an ORP sensor in a 6051010 or Quatro cable, check to see if the ORP sensor is installed in port 1 or port 2. If the ORP sensor is installed in port 1, enable ORP in ISE1 of the Sensor Setup menu. If the ORP sensor is installed in port 2, enable ORP in ISE2 of the Sensor Setup menu.
5. If using a pH/ORP combo sensor in a 6051010 or Quatro cable, ORP will not be measured or reported.
6. If using a 6051010 or Quatro cable, you must have a sensor installed in port 1 for port 2 to operate. Additionally, ensure that the sensor installed in port 1 is calibrated and in good working order. In 6051010 and Quatro cables, the sensors installed in port 1 and port 2 use the reference from the sensor installed in port 1 only. Therefore, if the sensor installed in port 1 is not working properly, the readings from the sensor installed in port 2 will be erroneous.
7. If you continue to get error messages during calibration, clean and recondition the sensor per the instructions in the pH Troubleshooting section of this document. If you suspect port contamination, follow the instructions in the Cleaning a Sensor Port section before reinstalling the sensor.
8. If you continue to have problems, you can check the offset of the ORP sensor by performing a factory reset to the ORP sensor. After resetting the sensor, compare the ORP mV readings in Zobell solution to the calibration value. The difference between values should be less than 100 mVs. If the difference is 80 mVs or higher, consider replacing the sensor as it is nearing the end of its life span.

