How to Extend the Life of Your YSI Automated Titrator
Life is all about routine and implementing a structure to your daily life. A routine can help improve your focus, organization, and productivity. Morning routines have been all the rage recently, with even Forbes publishing "The Four Morning Routines Of Successful Entrepreneurs." The ultimate goal of having a daily routine is to ensure you are doing what will help you keep your mind and body in optimal condition. Whether you focus on the basics like brushing your teeth and combing your hair or incorporating mindfulness and meditation, the goal is the same.
The equipment you use at work should not be an exception to this goal, as it too requires routine maintenance. Like everything else, many factors may influence the frequency of titrator care needed for your system: the titrant, your throughput, splashes and spills, and the surrounding environment are just a few. Routine inspections are essential to ensure optimal performance from your dosing system in regard to accuracy and precision, which means your laboratory staff must know what to look for when performing any maintenance procedures. In this blog, I will walk you through YSI's Maintenance Recommendations to ensure optimal performance of your titration equipment. If you prefer videos over reading, I’ve recorded a video explaining the proper maintenance protocols below.
Titration Anatomy
First and foremost, we should break down the anatomy of the titrator. Reference the image below for a visual representation of each component.
The dosing system refers to all the chemical-carrying components on your titrator (piston, cylinder, valve, titration tip, and tubes), which are vital to the accuracy of your instrument. The blue UV cover is a part of this system but only holds the glass cylinder in place. This piece only needs to be replaced if cracked or visibly broken. The moving components of the dosing system, the piston, and cylinder have the most exposure to mechanical strain, which can cause them to wear faster than other components and may require additional attention.
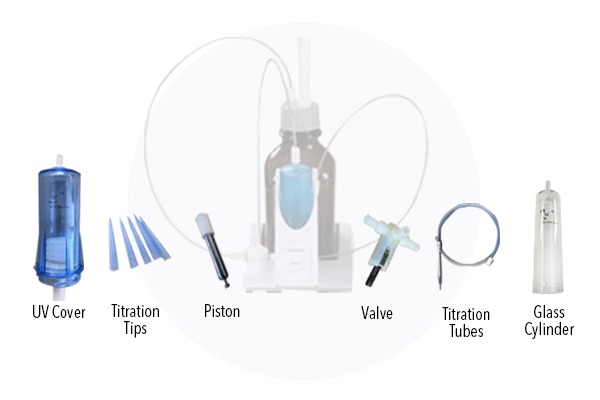
Figure 1: Dosing system of YSI Titrators, WA Exchange Unit, and all supporting parts.
Now that we've identified the system's makeup, it's time to recognize how your laboratory behaviors and upkeep can improve the durability and lifespan of your titrator.
First Step: Classify Usage
The first step is to identify the type of strain you are putting your system through. This will determine how frequently you should perform routine maintenance. Similar to your car requiring oil changes at specific mileage points or time between appointments, your laboratory equipment is very similar. The more you use your instruments, the more maintenance is required.
Below we define the two levels of use: heavy strain and normal strain. See what criterion separates the two to classify your situation best.
Heavy strain:
- Concentrations > 0.5 mol/L
- Chemicals that attack glass, such as fluorides, phosphates, and alkali solutions
- Solutions that crystallize out
- Iron (III) chloride
- Oxidizing and corroding solutions; iodine, potassium permanganate, Karl Fischer agents, HCl
- Solutions with a viscosity of > 5 mm2/s (food syrups/pastes, motor oil, ketchup, mustard, etc)
- Continuous daily use (> 8 samples per day)
Normal strain
- Concentrations up to 0.5 mol/L
- Chemicals that do not attack glass crystalize out or corrode.
- Weekly use or low daily use (1-8 samples per day)
Your application does not have to fit all the criteria defined as heavy or normal strain. However, if it fits into one criterion, it's recommended to assume that strain and follow the assigned routine maintenance schedule. I've listed a few heavy strain and normal strain examples below to provide context.
One example of a heavy-strain laboratory that I can think of off the top of my head falls within the paper industry. Kappa Number Determination is an application that utilizes several different chemicals in its sample prep and titration. Kappa Number determination uses highly concentrated titrants like potassium permanganate (KMnO4 @ 0.2 mol/L) and sulfuric acid (H2SO4 @ two mol/L) in sample prep and potassium iodide (KI @ 1 mol/L) during the titration, which is all dosed from different dosing units. Since this application has two dosing units using titrants with concentrations higher than 0.5 mol/L, the units are constantly exposed and would see the best results under the heavy-strain maintenance procedure.
High-throughput is also common in this application, which categorizes the other dosing units not exposed to chemicals, under heavy strain. These paper mills are high-paced, high-throughput, and caustic environments that demand a robust titrator. Still, even the most highly durable titrator requires an equally vital maintenance schedule.
Although Kappa Number Determination labs are extremely heavy-strain, not all labs are this extreme. I would consider a normal-strain laboratory example as a low-throughput drinking water plant doing Alkalinity Application for Temporary Hardness (aka Total Hardness). This application utilizes hydrochloric acid at 0.1 mol/L, and the sample being measured is water.
In a small village like Yellow Springs, OH, which only supports approximately 3,000 residents, a drinking water facility of that size is only doing a handful of titrations a day at most. Combined with a milder titrant and a low-throughput facility, this would fall under the normal strain maintenance schedule. Suppose you observe a large drinking water plant in a metropolitan city, where the throughput would be significantly higher. In that case, you could classify their alkalinity application under heavy strain just due to sample throughput demands.
Regardless of your laboratory strain classification, emptying and cleaning your titration unit is always a critical procedure -- especially only using the titration system on an infrequent (monthly) or seasonal basis. If this recommendation is ignored, the valve's piston may become leaky, causing damage to the piston burette. If liquid remains in the dosing system, it could lead to corrosion and potentially crystallization within the entire dosing system.
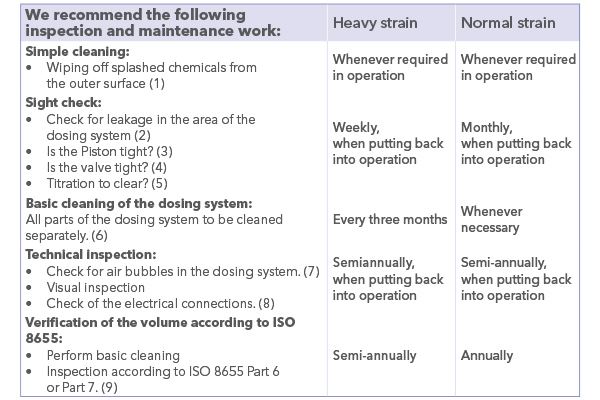
Table 1: Routine Maintenance Schedule for Heavy and Normal Strain Labs
Titration owners who do not follow the recommended routine maintenance schedule risk damaging their equipment and compromising the quality of their results.
Our experts in the field come across many customers who need to be reminded of this maintenance schedule and other tips for accurate titration results as well as proper electrode care. (Learn more, Top Tips for More Accurate Titrations).
You can learn more about application best practices for both titrations and electrodes in our respective handbooks.


Customer Example
Our experts recently worked with a customer who mysteriously cracked their blue UV cover for their glass cylinder on the dosing unit. They incorrectly installed their tubes during a routine replacement of their titration tubes and 3-way-valve. When they set up their system to titrate after the improper setup, their dosing system created a pressure vacuum in the piston and blue UV cover section of the dosing unit. The tubes thread directly onto the glass cylinder of the system to facilitate titrant dosing. With the additional pressure created, the piston raised the glass cylinder and into the UV blue cover. The sheer pressure caused the shell to crack, and they were forced to replace it before rerunning their system.
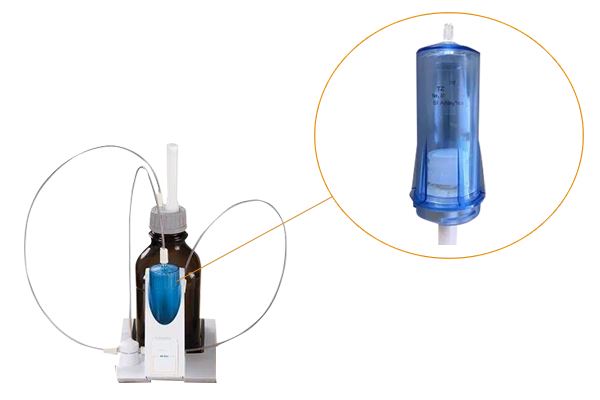
Figure 2: WA Exchange Unit and Blue UV Cover
Correctly performed routine maintenance is essential for the longevity and consistent quality of your data and instrumentation. It is like maintenance for your car. If you keep up on oil changes, engine checks, and the like, you can keep it running for hundreds of thousands of miles. We aim to help you do the same with your titration system!
Now that you understand at which frequency you should establish your maintenance schedule and why it is essential to perform routine maintenance, we can discuss the recommendations.
Step-by-Step Maintenance Recommendations
Each step in the maintenance recommendation is spelled out below. Contact us with any direct questions you may have.
Simple Cleaning:
[1] Wipe off your titration system using a soft cloth or Kimwipes. When necessary, wipe the titrator with a cloth and some water with a regular household detergent like Dawn or other gentle detergents.
Sight Check:
[2] Check the titration dosing systems for leaks. Signs of leaking include moisture or crystalline built up around threaded connections of the tubes, at the sealing lips of the piston inside the dosing cylinder, or the valve.
[3] If you start to notice visible liquid between the first lip of the piston seal, then this must be monitored frequently. During regular operation, moisture buildup can occur under the first sealing lip and disappear again. This incident on its own is no reason for replacement. When there is a visible liquid between the piston's first and second seal, both the piston and glass cylinder must be replaced.
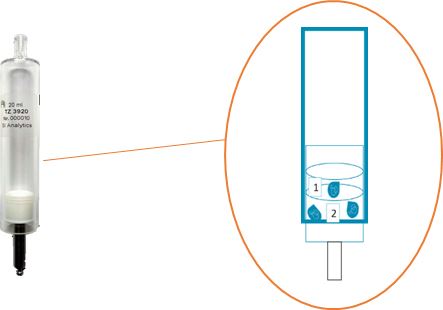
Figure 3: Glass cylinder and piston, diagram of cylinder and piston with water.
[4] When evaluating the 3-way valve, it must be removed from the titration unit and checked for moisture on the bottom of the valve and inside the dosing system where the valve is placed.
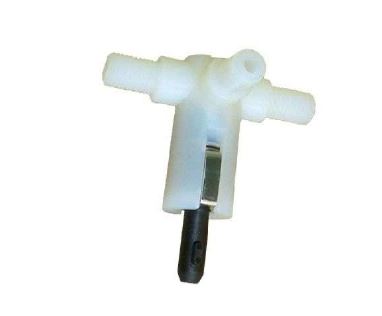
Figure 4: 2/3 Way valve
[5] Crystals and sediment can build up in the titration tip, which might impede the dosing process, causing incorrect results. This means that when the titration tip is blocked, not all liquid can dispense, creating a mismatch between the total volume dosed and the actual volume needed. The titration graph would "look" the same for a single equivalence or endpoint titration, but the result of your calculation will be off due to the endpoint volume being higher than usual. Ensure that the titration tip is clear, and clean or replace when necessary.
Basic Cleaning:
[6] Disassemble the entire dosing system and rinse all the dosing parts like the cylinder, 3-way valve, and piston with distilled water.
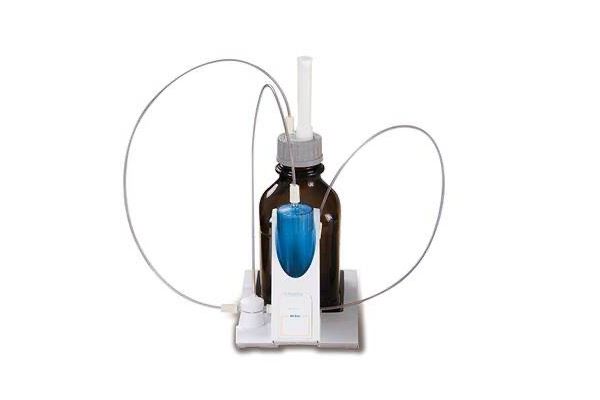
Figure 5: WA Exchange Unit
Technical Inspection:
[7] When checking for air bubbles in your dosing system, you will want to rinse the titration system dosing the full burette into a waste beaker. When the system is dosing, you will want to watch for air bubbles at the tip of the cylinder and in the titration tubes. Another sign of air bubbles is an inconsistent stream of titrant from your titration tip. If you identify bubbles in the system, re-tighten all the connections, then repeat a single rinse.
If the air bubbles still occur, try reducing the filling speed of the cylinder. This does not resolve the issue. It may be caused by a faulty seal between the sealing lip of the piston and the cylinder, which will require replacement.
[8] Evaluate the back panel of the titration system to evaluate the electrical plug contacts for corrosion and mechanical damage. If corrosion or damage is detected, those parts will have to be repaired or replaced by new parts.
Verification:
[9] Burette inspection according to ISO 8655 Part 6.
ISO 8655 Part 6 specifies the gravimetric determination of measurement errors for conformity testing of piston-operated volumetric apparatus that is compliant with their standards in ISO 8655 Part 3 for permissible errors in these piston burettes. This inspection test will confirm that your dosing system is continuously compliant to an accuracy: < 0.15 % and precision of < 0.05 - 0.07 %. This procedure done on an annual basis will keep your dosing system complaint about any audits that may occur. It can also ensure that your dosing system is still dosing in a range that guarantees accurate results year after year.
The work is offered as a service at YSI, including a manufacturer's certificate, for a nominal fee. In this case, the titration device is to be sent in. Don't hesitate to contact the YSI service department if you would prefer someone to come on-site to do preventative maintenance. We do have annual service packages offered through our field service department.
