Improve the Accuracy of Titrations in Your Lab
(Updated September 2021)
Titration is a classic technique used for quantifying the presence of an analyte in a sample. The simplicity and overall accuracy of the procedures are what have kept them in use. But don’t be fooled, there is always room for improvement as far as techniques and practices are concerned. It is common to see variability in test results from analyst to analyst, and there are several factors that can affect the accuracy of your results.
Standardize Your Titrant
“When is the last time you’ve standardized your titrant?” This is the first question we ask our customers during troubleshooting or when questioning a result.
Standardization is a procedure that normalizes the titration system and provides the most accurate titrant concentration. This value is critical in the final calculation for the analyte content. If the concentration is not known precisely, it can throw off a result. Some titrants, for example, sodium hydroxide, can absorb CO2 from the air causing the true concentration to decrease. You can minimize the atmospheric influence on these hygroscopic titrants by using a CO2 absorption tube and filling it with soda lime. However, the best practice is to perform titrant standardization.
Titrant standardization is typically performed in triplicate at a minimum. A % RSD (Relative Standard Deviation) is calculated and a value of 1% or less is accepted in most GLP (Good Laboratory Practice) laboratories. The YSI titrators are preprogrammed with standardization methods for the most common titrants (ie NaOH, HCl, H2SO4, AgNO3, and many others) which make it simple to implement this procedure into practice.
Figure 1 (below) illustrates an example of a common standardization procedure on a strong base.
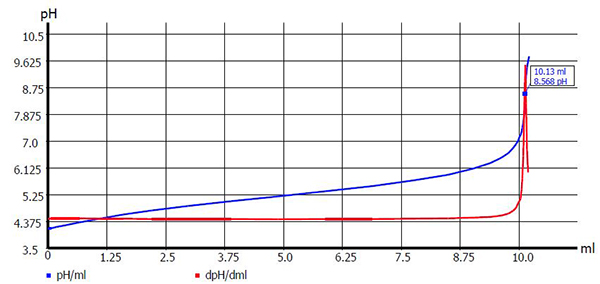
Figure 1: Titer determination of 0.1 mol/l NaOH with potassium hydrogen phthalate
It is recommended to perform standardization anytime fresh titrant is added to the reservoir bottle or periodically (monthly or bimonthly). If there is a question about the results (high or low), performing this titrant concentration check is a good place to start.

Homogenize Your Sample
Depending on the type of sample you are testing, homogenizing might be something to consider. Homogenization is a mechanical process that makes things uniform. As it pertains to titration, homogenization can help in making the molecules more “accessible” so they can react with the titrant.
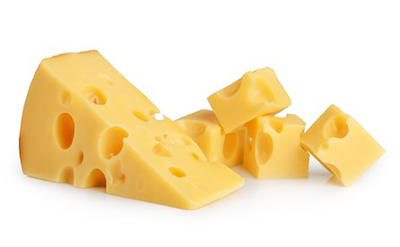 A good example of this is in the titration for salt content in cheese. It is difficult to break down the sample and release the salt with just a magnetic stir bar and stir plate. A homogenizer can help break down the sample so that the salt is released and can react completely with the titrant. Without a homogenizer, you may see lower results than expected. If you need help choosing a homogenizer, let us know! **We do not offer them, this would be something our application specialist would recommend from a third party**
Check Your Sample Measuring Techniques
We might be taking a trip down memory lane here for you fellow chemists. Remember back in general chemistry courses when you learned how to use class A volumetric pipettes? Or how weighing techniques were important? However you measure your sample, it is of the utmost importance that it be done accurately. If you look at the basic calculation used in titrations, it is obvious why:
C2 = C1 * V1
V2
C1 = Concentration of titrant
V1 = Volume of titrant consumed at end point
C2 = Concentration of analyte in sample (UNKNOWN)
V2 = Volume (or weight) of sample
In the above calculation, you can see that the volume of sample is used to calculate the amount of analyte in the sample. If there are any discrepancies in this V2 value, it will affect your results.
For liquid sample measurement, glassware accuracy is typically measured in terms of tolerance. This tolerance is the uncertainty that is made in the measurement using the glassware. Graduated cylinders bring with them a measured volume uncertainty of 0.5 to 1%. Volumetric pipettes generally deliver the specified volume ± 0.1%, a dramatic difference from the graduated cylinders. Typically in titration experiments, sample volumes will be relatively small (many times < 20ml) so it is generally a good idea to work with volumetric pipettes.
Solid samples should be weighed with a calibrated balance. The type of balance used will depend on the number of significant figures desired in the final result. For example, if you require the result be displayed to the hundredths place, a two place balance would suffice. On the other hand, if your results are reported to the fourth decimal, a four place balance should be used. A calibrated and stable analytical balance is recommended for the most accurate weight.

Calibrate Your Electrode Regularly
This one sounds obvious, but is a necessary reminder. If you are working with an electrode for your titration, you should know that the success or failure of the measurement depends on the condition of the probe.
A pH electrode should be calibrated each day (at least once) it is used to get the most accurate reading. A two-point method is typically sufficient, as long as the appropriate buffers are used. What do we mean by appropriate? Buffers should be chosen based on your routine measurement range. For example, if your titrations typically take place in the 5-6 pH range, you should select pH buffers 4 and 7. Using fresh and clean buffers is also important for a successful calibration.
Read Blog Post: Which Is Better - Manual or Automated Titrations?
Over time, an electrode’s response time will increase which is an indication that calibration should be done more frequently. The offset and slope may change as well and this, again, will dictate how frequently the calibration should be done. The following limits are widely used, within which an electrode is still considered to be trustworthy:
Slope 95% to 102%
Zero point pH 6.5 to pH 7.2
A well preserved electrode with a good calibration can last an average of 1.5-2 years depending on the frequency of use. If you have any questions or need assistance choosing the right electrode for your application just ask us or learn more about pH.
Check for Air Bubbles in the Burette
Whether you’re performing titrations manually or via an autotitrator, air bubbles can form in your burette. This can lead to false low results since air is taking up space in the burette and the measured volume of titrant is more than what is actually consumed.
In the manual stopcock burettes, air bubbles can form at the tip of the burette. These can be removed by flicking the burette and/or purging several milliliters of the titrant through. If you are working with an autotitrator or a piston burette, air bubbles can form either in the burette cylinder or in the titration lines. Flushing titrant through the burette and tubing will eliminate any present air bubbles.
