EXO Sonde Optical DO Sensor Cap Replacement
Follow these instructions to replace the sensor cap on an EXO optical dissolved oxygen (ODO) sensor once the previous cap has exhausted its usable life (typically about one year). This cap is shipped in a humidified container and should be stored in a 100% humid environment. If the sensor cap dries completely, follow instructions in the EXO User Manual to rehydrate it.
1) Remove Sensor Cap
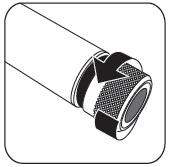
Rotate the sensor cap with your fingers counterclockwise until free.
Note: If possible, do not use any tools during this process. However, should the cap be immovable following deployment, carefully twist the sensor cap with pliers until it comes loose. Do not use pliers on the sensor body, and take great care not to damage the sensor threads.
2) Replace O-Ring
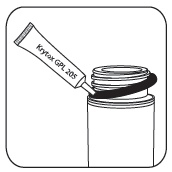
Without using tools, remove the previous o-ring (pinch the o-ring out, then roll it upwards over the threads); discard it. Visually inspect the new o-ring for nicks, tears, contaminants, or particles; discard damaged o-rings.
Without twisting it, carefully install the new o-ring over the threads and into its groove, then apply a thin coat of Krytox lubricant to the o-ring only.
3) Install a New Sensor Cap
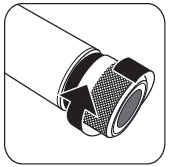
After the o-ring is installed and lubricated, wipe the clear window at end of the sensor with a lint-free cloth until clean. Then dry the inside cavity of the sensor cap with a lint-free cloth. With a clockwise motion, thread the new sensor cap onto the sensor until it is finger-tight. The o-ring should now be compressed between the sensor cap and sensor.
Note: Do not over-tighten the sensor cap. Do not use any tools for the installation process.
4) Configure Sonde for New Cap
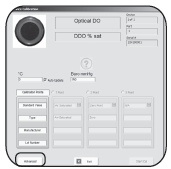
In KOR software, configure the sonde for the new sensor cap. Click the Calibrate button and navigate to the DO calibration window.
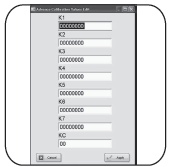
Click the Advanced button and enter the membrane cap coefficients (included with your new DO cap).
Note: Calibration coefficients are associated with specific individual sensor caps. They cannot be used for other ODO sensors. The serial number with the calibration coefficients below matches the serial number engraved on the outside of the sensor cap.
5) Store Sensor Cap
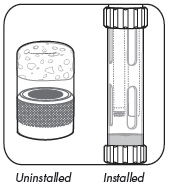
The sensor cap is shipped in a humidified container and should be consistently stored in a 100% humid environment. Prior to installation, ensure the cap’s container remains moist. Once the sensor cap is installed on the sensor, maintain this environment by placing approximately 0.5 in (1 cm) of any water (deionized, distilled, tap, or environmental) in the bottom of the calibration cup and screw it tightly onto the sonde to prevent evaporation. You may also store the sensor by submerging the cap end in water.
See more EXO support videos at YSI University | EXO.
Additional Blog Posts of Interest:
Advantages of Smart Sensors and Ports on Water Quality Sondes
Trouble Collecting Data with Your Water Quality Sonde? Try This!
Top 5 Challenges to Collecting Water Quality Data - Challenge 1
YSI Expert Tip 1 of 7 - Get Your Water Quality Sonde Field Ready