Maximizing uptime | Your complete 6-month preventative maintenance guide for the YSI 2900 series biochemistry analyzers
The YSI 2900 series of Life Science instruments are invaluable tools in getting fast, accurate measurements of specific sugars in a wide range of sample matrixes. Maintaining your device at regular intervals assures that you will have the best results and maximize the longevity of your analyzer!
This blog references the 2900D, but these steps also apply to the 2500 or YSI 2900C Biochemistry Analyzer. You can find additional steps for the 2950 series of instruments, which have additional modules and tubing requirements, in the 2900 series user manual.
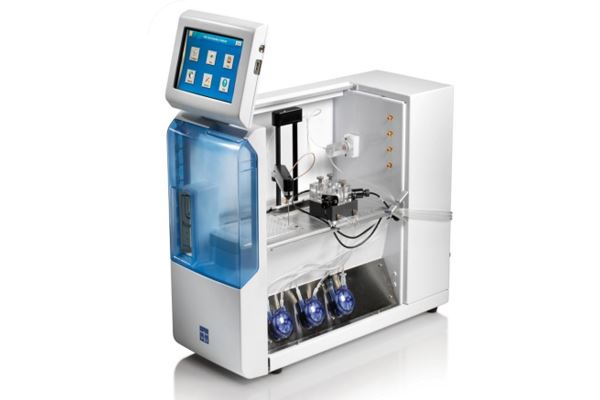
YSI 2900D Biochemistry Analyzer
Shown here: the YSI 2900D, known for its speed, small sample requirements, and touchscreen ease of use. This model supports 1–2 analyte measurements and is built for minimal downtime with features like onboard training and clog-resistant design.
Preventive maintenance is the best way to ensure minimal downtime. There are simple daily and monthly maintenance tasks that help your 2900 run smoothly throughout its lifetime. The most involved maintenance, however, is the 6-month preventive maintenance, which we are going to delve into here. It’s a short process that replaces and refreshes portions of the 2900 so that can seamlessly continue operating.
To see a video demonstration of the entire 6-month PM process, please check out the webinar here: Preventive Maintenance Best Practices for YSI 2900 Series Biochemistry Analyzers.
Daily maintenance checks
Perform your daily checks at the beginning of each day or shift to ensure functionality. Check your calibration solutions, waste, and buffer to ensure they are topped off and within their use-by dates. You’ll want to perform your daily integrity and linearity tests for the appropriate chemistries you have installed.
Monthly maintenance checks
Every month, you will want to clean out the fluid lines of the instrument. Flush calibration and buffer tubing with 1% hypochlorite (bleach) solution, then follow with a flush of DI or other high-purity water. Then, clean the buffer bottles with the same treatment, soaking them for about 10 minutes in the 1% bleach solution, followed by a thorough rinse in clean water.
Six-month (6M) preventive maintenance
Perform this maintenance every 6 months on your YSI 2900D series analyzer. These instructions also work well for the 2500 and 2900C models. The 2950D model has up to 2 more sample chambers and some additional tubing that requires replacement, so note that you will need to perform some additional steps with this model.
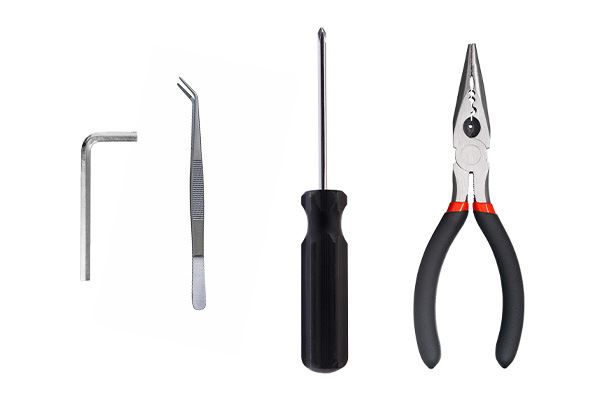
What you will need:
- Allen wrenches (3/32” and 7/64”)
- Tweezers
- Philips-head screwdriver
- Pliers (optional, but helpful)
First steps: Cleaning the sample and waste chambers
Sample Module Cleaning
From the Service screen, [Sipper] tab, touch the button under Location. Select [Station 1-P96] to move the sipper away from the sample module. Lift the cover off the instrument, revealing the interior of the device.
Unscrew the three thumbscrews on top of each sample module.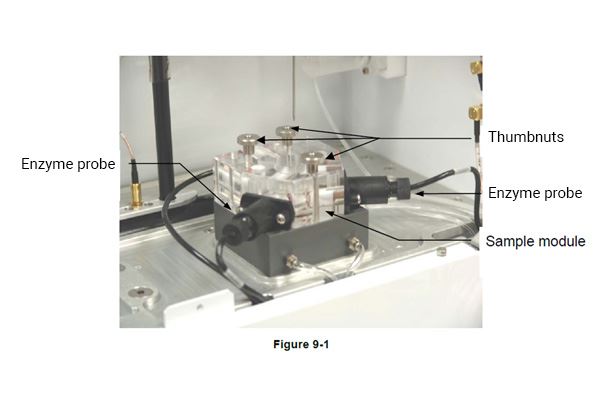
Remove the sample modules. Remove and discard the small magnetic stir bar inside each module. Immerse the modules in an authorized disinfecting agent for about 10 minutes. (See Section 9.1 of the manual) If soiling or residue is visible, you may immerse the module in a water-filled, room-temperature sonification bath for a maximum of 10 minutes. After cleaning, rinse the modules for 3 to 5 minutes with an authorized rinsing agent and wipe dry with a lint-free tissue.
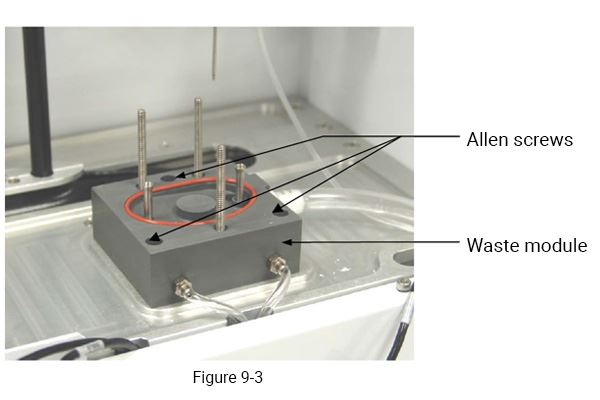
Waste module cleaning
Unscrew the three hex screws from the top of waste module 1. Disconnect the calibrator and waste tubing and remove the waste modules from the base plate. Then, proceed to clean the same way as you cleaned the sample chamber.
Tech Support Tip! Be sure to remove the O-rings from the base plate. Clean up any salt deposits or fluid on the base plate. Ensure you dry the base plate and all other parts.
Sipper pump seal replacement
First, disconnect the tubing from the Sipper Pump. Remove the two hex screws from the Sipper Pump head and remove it from the instrument wall (see image below).
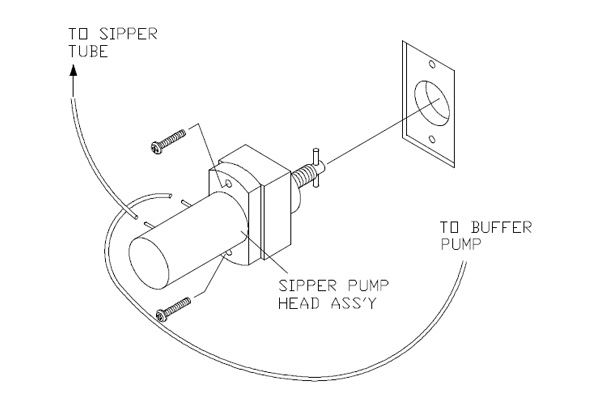
Pull the white pump base from the clear pump housing. Immerse the clear pump housing in an authorized disinfecting agent. After cleaning, soak the pump in clean water for 5 minutes and wipe dry with a lint-free tissue. Replace the O-ring seals as shown below. Be sure to reinstall the black spacer between the two small red O-rings. Reassemble the pump, position the plunger as shown below, and install it back on the instrument.
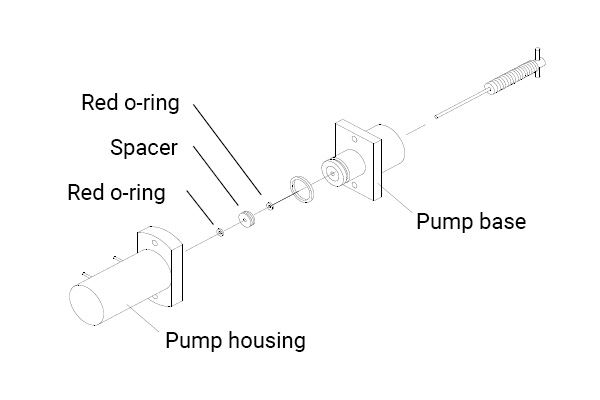
Caption: Sipper pump seal replacement

Caption: Sipper pump plunger position
Tech Support Tip! When re-installing the pump head assembly, the plunger MUST extend at least 1/2² from the base of the pump (see Figure 9‑6). This will assure proper alignment between the pump head and the drive hub.
Next steps: Changing out the tubing
Bottle tubing
Disconnect the tubing and unscrew the cable connectors from the buffer, waste, and calibrator bottles on each side of the instrument.
Lift the bottle tray on the right side of the instrument up and remove it. Remove the bottles from the tray(s) and clean the bottles and caps with the appropriate disinfecting agent (see Section 9.1 in the user manual for more information).
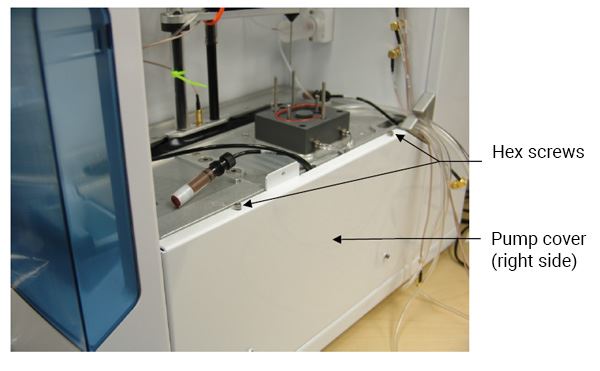
Remove the two hex screws holding the pump cover on each side of the instrument. Lift the covers and remove them.
Pump tubing replacement
Tubing life depends on instrument usage. Replace the buffer and calibrator pump tubing at least every 6 months or 1000 hours, whichever comes first.
Buffer pump tubing removal
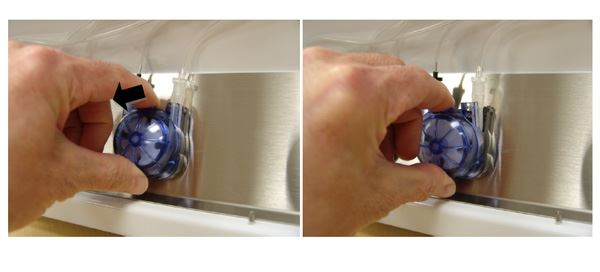
Pull out firmly on the top edge of each pump head cover (left edge of Buffer Pump 2 and 3). The pump head cover should snap off. See images below:
Buffer pump tubing
Remove the pump tubing from each pump.
Install buffer tubing
Apply plenty of buffer grease to the large diameter section of each tubing.
Tech Support Tip! The buffer pump tubing and calibrator pump tubing each require a different type of grease. It is important to apply the correct grease to each type of tubing.
Insert the new pump tubing around the pump roller assembly and into each buffer pump. Make sure the small white fitting with the small diameter tubing is on the left side of pump 1 (bottom for pumps 2 and 3). Replace the pump head cover onto each buffer pump and press until it snaps into place.
For Buffer Pumps 2 and 3, insert the small diameter tubing through the holes in the manifold. Connect the end of the small-diameter tubing to the buffer valves as described below.
Connect buffer tubing
Perform these steps one-by-one to help keep track of the tubing being added and removed.
Connect the small-diameter tubing from Buffer Pump 1 to the inner channel of the bottom valve.
Thread the small diameter tubing from Buffer Pump 2 (Buffer Pump 3 for 2950D-4 only) through the inner channel of the three tubing holders and connect it to the inner channel of the top valve.
Thread the small diameter tubing from Buffer Pump 3 (Buffer Pump 2 for 2950D-4 only) through the outer channel of the three tubing holders and connect it to the outer channel of the top valve.
Connect the larger diameter tubing from the top of buffer pumps 2 and 3 to the top fitting of each manifold.
Connect Buffer bottle tubing marked B2 and B3 to the matching fittings on the opposite side of the manifolds.
Calibrator pump tubing
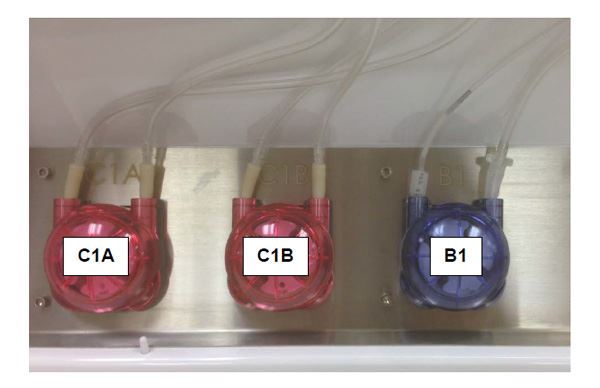
Peristaltic Pump C1A
Note that the tubing for C1A is slightly longer than C1B.
Apply plenty of calibrator grease to the longer section of new calibrator pump tubing, then insert the new pump tubing around the pump roller assembly and into calibrator pump C1A. Make sure the short section of tubing is on the left side of the pump. The tubing attached to this fitting connects to the left fitting on waste module 1.
Place a red pump head cover onto the cal pump and press until it snaps into place. Follow these same steps for C1B to complete this step!
Install waste modules
After cleaning, flush the waste modules with copious amounts of authorized rinsing agent (such as DI or similar water) to remove any traces of the disinfecting agent. Install new O-rings in the base plate under each waste module. Reinstall waste module 1 using the three hex screws previously removed. Slide waste modules 2 and 3 over the threaded rods. Connect the ends of the new calibrator tubing to the fittings on the side of each waste module. Connect CA to the left fitting and CB to the right fitting of each module.
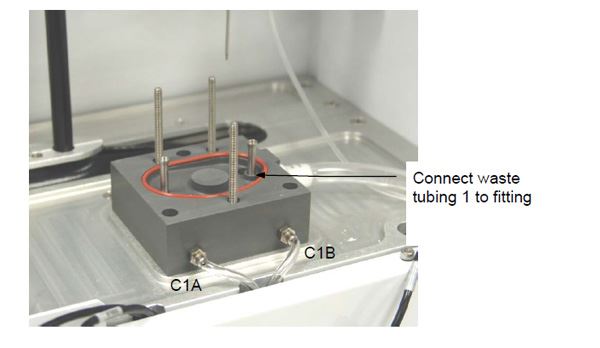
Calibrator and waste tubing (Module 1)
Waste tubing
Simply slide the new waste tubing onto the large fitting on the side of each waste module.
Install sample modules
After cleaning, flush the sample modules with copious amounts of warm water, then rinse with authorized rinsing agent (see Section 9.1) to remove any traces of the disinfecting agent. Install the sample modules. Remember to install the stir bar and the module seal O-ring. Secure the sample modules using the three thumb nuts. Install new O-rings on the temperature probes, then install the temperature probes into each sample module.
Be sure to clean the enzyme probes before installing them in the sample module.
Tech Support Tip! Touch a bare metal chassis screw before handling the sipper tube to prevent possible damage due to an electrostatic discharge.
Final steps: Sipper and bottle replacement
Sipper replacement
From the Service screen, Sipper tab, move the sipper to Location [Station 1-P96] to allow access to the sipper.
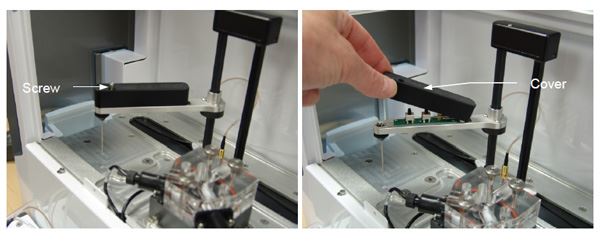
Remove the screw holding the sipper arm cover, then raise the cover up and slide it out of the sipper arm. Disconnect the tubing from the sipper.
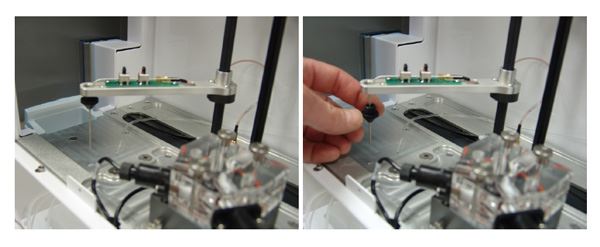
Unscrew the sipper cone, slide it down and remove it from the sipper. Loosen the two needle mount screws two turns, then remove the sipper by sliding it straight out of the mounts.
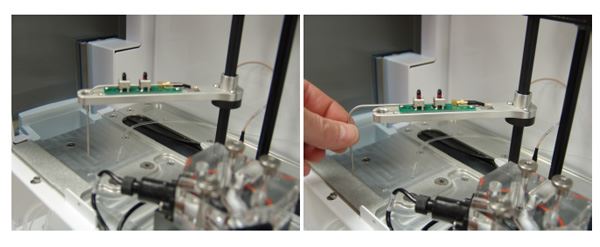
Carefully insert the long, thin end of the new sipper and slide it into the mounts. Slide the sipper cone up the sipper and screw it into the sipper arm. Center the sipper in both mounts. Tighten the mount screws gently until they contact the sipper, then tighten an additional ¼ turn (do not over tighten). Connect new tubing from the Preventive Maintenance Kit to the new sipper. Install the sipper arm cover and secure using the hex screw (do not over tighten).
Route the new sipper tubing behind the sipper assembly and connect the other end to the front connector of the sipper pump. Follow the user manual instructions to align the sipper with the sample modules (see 4.5 Align Sipper).
Install bottles
Place the bottle trays next to the instrument and install the bottles. Connect the tubing and cables to the bottles. Be sure to install new reagents in the clean bottles!
Prime fluid system
Prime the buffer and calibration systems using the system software. After checking for any leaks, reinstall the pump covers on both sides of the instrument and slide the bottle trays into position.
Calibrate the instrument and run the daily checks to confirm operation.
Keep your lab running at peak performance
Regular preventive maintenance is your best defense against costly downtime and unreliable data. By following this 6-month maintenance schedule for your YSI 2900 series analyzer, you're investing in years of dependable performance and protecting the quality of your analytical results.
Whether you're managing a single analyzer or planning a complete laboratory upgrade, our team of application engineers stands ready to help optimize your analytical capabilities. From instrument selection to compliance support, we offer free virtual consultations to ensure you're getting the most from your laboratory investments.
Consult the manual for the steps specific to your 2900-series analyzer!
Check out our webinar to watch our resident expert perform this and all other 6-month PM activities!
Ready to take your lab to the next level? Schedule a free consultation with our laboratory experts and discover how YSI's complete portfolio of analytical solutions can streamline your operations and meet your most challenging compliance requirements.